

My strategy is this (for an engine I've lost the timing on):
1. Get no. 1 at TDC on firing stroke. You can verify this by removing the drivers side rocker cover and check that both valves on no. 6 are slightly open.
2. Refit the distributor such that one of the spikes on the reluctor is pointing at the spike on the pickup. This is the tricky bit as the distributor spindle turns as you slide it in, and then has to engage on the oil pump. It's very easy to get it 1 tooth out on the cam. Also make sure the distributor body has plenty of rotational adjustment before it hits the head / ancillary bracketry.
3. Note which HT post the rotor arm is pointing at, put no.1 plug lead on it, and work around 18436572 in a clockwise direction.
Once it starts, then you can tune it up.
Chris.
Idiot's guide to setting up Rover V8 timing.
Moderator: phpBB2 - Administrators
Idiot's guide to setting up Rover V8 timing.
Does anybody have anything like the above?
I have an SD1 efI, had to take the dizzy out to prime the oil pump, took photo's and put everything back as removed - no start, but felt like it wanted to.
Convinced that I had put it back incorrectly, I set things up as described on page 68 of the haynes manual - now it's worse, the engine "spits back" which tells me that my original setting was closer.
The engine has 'nt been run for 12 months due to the amount of weldng the car needed, hence having to re prime the oil pump.
Any advice appreciated, diagrams even more so.
My strategy is this (for an engine I've lost the timing on):
1. Get no. 1 at TDC on firing stroke. You can verify this by removing the drivers side rocker cover and check that both valves on no. 6 are slightly open.
Or remove the other rocker cover to make sure that both valves on 1 are shut. I prefer this method as you can see the inlet valve start to close and then look at the timing mark coming round to TDC.
2. Refit the distributor such that one of the spikes on the reluctor is pointing at the spike on the pickup. This is the tricky bit as the distributor spindle turns as you slide it in, and then has to engage on the oil pump. It's very easy to get it 1 tooth out on the cam. Also make sure the distributor body has plenty of rotational adjustment before it hits the head / ancillary bracketry.
Decide where you want no 1 plug lead to be on the dissy cap. Turn the dissy so the rotor points there, then note the position of the oil pump drive on the dissy. Turn the oil pump shaft to match this position. Rotate the dissy anti clockwise by 30 degrees and lower the dissy into place.
3. Note which HT post the rotor arm is pointing at, put no.1 plug lead on it, and work around 18436572 in a clockwise direction.
Once it starts, then you can tune it up.
Chris
Perry Stephenson
MGB GT + Rover V8
9.62 @ 137.37mph
Now looking for 8 seconds with a SBC engine
http://www.youtube.com/watch?v=nVscbPHgue0&list=UUqIlXfSAoiZ--GyG4tfRrjw
https://www.youtube.com/watch?v=eg3avnsNKrc&index=2&list=FLqIlXfSAoiZ--GyG4tfRrjw
MGB GT + Rover V8
9.62 @ 137.37mph
Now looking for 8 seconds with a SBC engine
http://www.youtube.com/watch?v=nVscbPHgue0&list=UUqIlXfSAoiZ--GyG4tfRrjw
https://www.youtube.com/watch?v=eg3avnsNKrc&index=2&list=FLqIlXfSAoiZ--GyG4tfRrjw
Set the engine on the timing mark - 6 BTDC on my SD1 - checking it is the No1 firing stroke. Set the oil pump drive at ten to four o'clock. Set the rotor arm so it is at right angles to the car pointing to the nearside. Insert the dizzy - the rotor arm will turn, engage the pump drive, and point to the correct position for No1 plug lead. Set the body so No 1 plug lead is correct and the VR sensor aligns with the spike on the toothed wheel. Start the engine and set the timing accurately with a timing light.
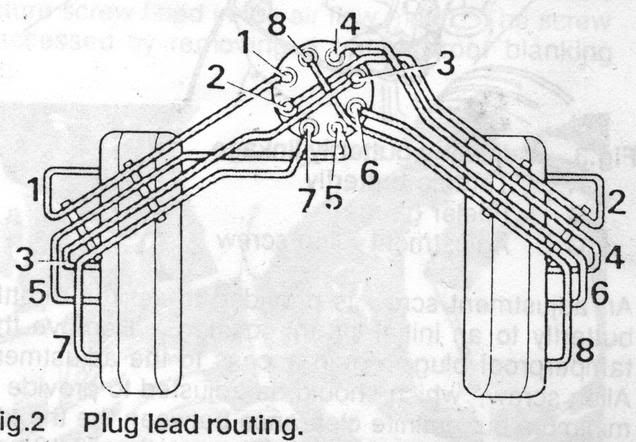
This is how you should end up with the leads. Note the way they cross - this is the best way to minimise the chance of cross firing.
This is how you should end up with the leads. Note the way they cross - this is the best way to minimise the chance of cross firing.
Dave
London SW
Rover SD1 VDP EFI
MegaSquirt2 V3
EDIS8
Tech Edge 2Y
London SW
Rover SD1 VDP EFI
MegaSquirt2 V3
EDIS8
Tech Edge 2Y
