Right, where on earth do I start!!. (this is going to be a loooooooooooooong post)
Not seen the road much since the rolling road day last march!!!!.
First mod I did was to ditch the holley 600 with vac secondaries and fit
a double pumper (on perry's recommendation at the RR). What a differnece! she pulled much harder from lower revs and there was no "waiting" for the carb to catch up. Rear tyres not too happy about this mind

Couple of months later, me and a mate had a good chat and thought, how many racing vans do we see around?? Not enough was the answer!, and so the project began.................. (you may think im mad, but you wouldnt be the first

Stripped out the dash and carpet to start with, upon inspecting the wiring, i found basically a rather dangerous nightmare, so the whole lot has come out. (double pumper looking right at home here)
I also discovered that the lock up converter had not been wired up on the gearbox so lucky that i havent burnt it out!!

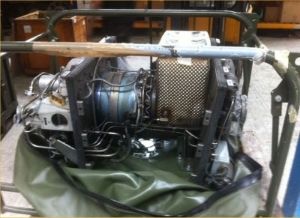
Next started with an overhaul of the cooling system. The radiator that was in it wasnt really up to the job, so that is being replaced by one from
an audi.


It sat a touch high, so modded the cross member to suit. Also modded some audi gearbox cooler lines so i can hook it up to the 700r4 in the van.


We are going to remake the exhaust system so that its is more free flowing, which involved removing the underslung fuel tank. Opted for fitting one in the back, and running teflon lined braided hose to he front (keep the fuel smell out).
Made up some mounting beams for the fuel cell. Was originally going to mount it to the floor, but it has a sump and that would have meant a big hole and running the fuel line under the car which would have been a nightmare due to all of the crossbeams supporting the floor!!


I still need to make up some straps for this fuel cell, as the little brackets welded to it arent that thick so would the van be in an accident, they would be ripped off.
Can see in the second pic i had started making up the fuel lines. Big thanks to Tony for pointing me in the direction of Alex at Torques UK, got everything i needed no probs.
Fuel tank and fuel pump installed.

Now had to get the fuel line into the engine bay. So, cut a hole in the floor, as you do. This hole and the bracket holding the fuel and power lines will have a cover made to seal it all up.

Replaced the carb fuel rail, with one made to accepty AN fittings, and made up the braided line to connect up to the tank.


Just to be safe, where the fuel line and wiring runs from front of the van to the back, going to make a cover for it to protect it from damage.
This is all still mock up at the moment, the interior of the van atleast needs a repaint so it will all come out again. Also needs testing to make sure it all works!!!
Next update, should have the radiator mounted properly and plumbed in, then can see if she will fire after couple of months sitting
Any comments/suggestions/advice much appreciated.
More to follow
Stuball