
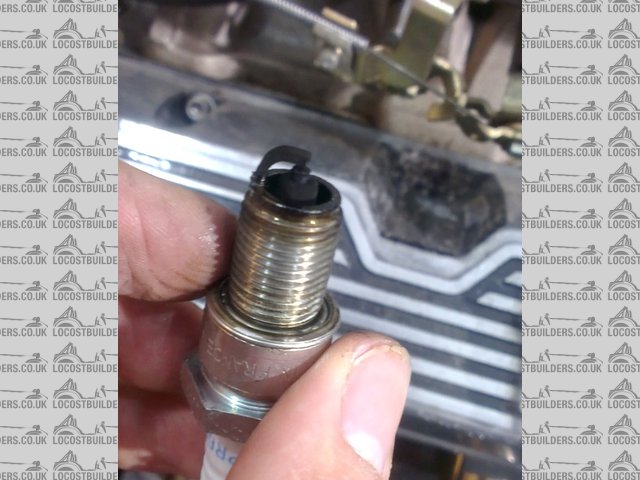
Got my RV8 running now and it has issues. I think it's either running rich or somehow oiling up the spark plugs. Once the car is running it seems to be fine. However if left over a period of time, say a couple of weeks the plugs are black and wet. It struggles to start and one or more cylinders don't seem to be firing. The exhausts are cold. Take the spark plugs out of the offending bores and they are wet with black fluid. I don't know if its oil or sooted petrol. Clean then up and it'll fire and run happily.
I am new to building engines so (and I built this one) any advice is appreciated. I thought that maybe the valve guide seals were the offending problem but there seems to be differing advice on the net.
Wet or Oily Plugs RV8
Moderator: phpBB2 - Administrators

have you tried doing a compression test yet?
Regards Tony C (COOPS)

MS2 V3.57 Ecu mapable efi and wasted spark ignition.
Procharger D1SC supercharger and Cossie RS500 Intercooler @ 14psi of Boost. 416 RWHP, (boost leak)
Forged 4.8 V8 kitted out with the dogs Cajones of parts.
Sponsored by: www.v8performanceparts.co.uk, www.interpart.biz, www.caprisport.com & www.baileyperformance.co.uk
The Eddy 500 always seems to over fuel RV8 lumps regardless of the size of engine. I think that they are a good carb but they need to be recalibrated. First thing that I'd do if it was my engine woudl be to take the carb apart, check the float heights then make a note of the primary jets, the secondary jets and the rods that are fitted. (They control the fuel flow on the primary side of the carb along with the primary jets)
Also what sort of fuel pump are you using, the eddy carb needs around 6.5 PSI fuel pressure, any more and it could sart to flood.
It is worth getting this sorted ASAP before you end up killing the piston rings and bores due to bore wash.
Also what sort of fuel pump are you using, the eddy carb needs around 6.5 PSI fuel pressure, any more and it could sart to flood.
It is worth getting this sorted ASAP before you end up killing the piston rings and bores due to bore wash.
I am using a facet redtop pump which should be okay.
I think i am confident enough to take the carb apart now. I have watched all the tutorial videos on the Web. Would it benefit me to buy the edelbrock carb kit which is quite expensive or just buy the relevant jets etc one size leaner? If so where from?
I think i am confident enough to take the carb apart now. I have watched all the tutorial videos on the Web. Would it benefit me to buy the edelbrock carb kit which is quite expensive or just buy the relevant jets etc one size leaner? If so where from?
Check out what's in the carb and report back, I'll tell you if the setup is standard or not. The calibration kits are OK but they are a lot of money and usually you will use a couple of parts in the kit.irony wrote:I am using a facet redtop pump which should be okay.
I think i am confident enough to take the carb apart now. I have watched all the tutorial videos on the Web. Would it benefit me to buy the edelbrock carb kit which is quite expensive or just buy the relevant jets etc one size leaner? If so where from?
My mate has virtually every jet and rod that you can get for these carbs, he will sell you just the jets and rods that you need.
Now the tricky bit is working out what you need! I have worked on a couple of 3.9 engines, they did not end up with the same carb setup, really an exhaust gas analyizer is the way to go, that and a shed load of rods and jets!
The float heights are always miles out even on brand new carbs! Also with the engine switched off but the fuel pump running look carefully at the primary boosters, no fuel should be dripping from them, if any is then the float valves may have crap in them which is causing the carb to flood.
Took the carb apart last night and it was way easier than I thought. I watched a couple of videos on the net and it seemed to go okay.
1. I think the float heights are way out. By at least 3 or 4mm. I don't have a handy 7/16 drill bit but they are still out. Am I right in thinking I just bend the metal as per the manual?

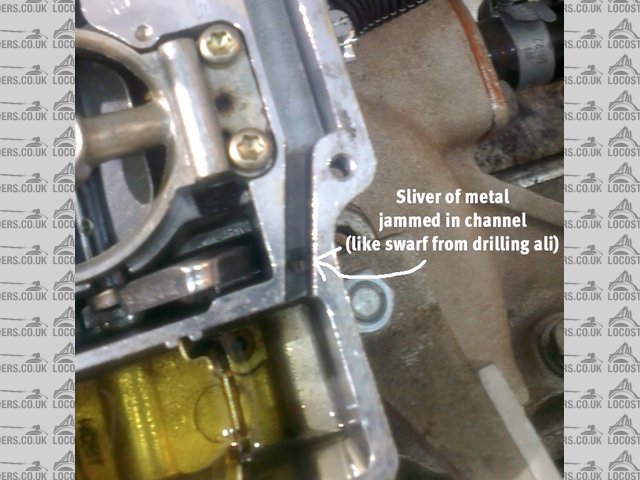
2. Found a tiny sliver of metal that shouldn't be there.
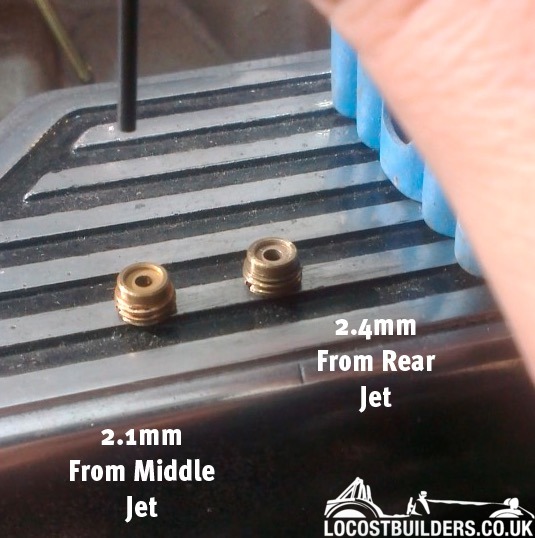
3. How do you measure the jets accurately? I found the hole in the jet to be 2.1mm and about 2.4mm
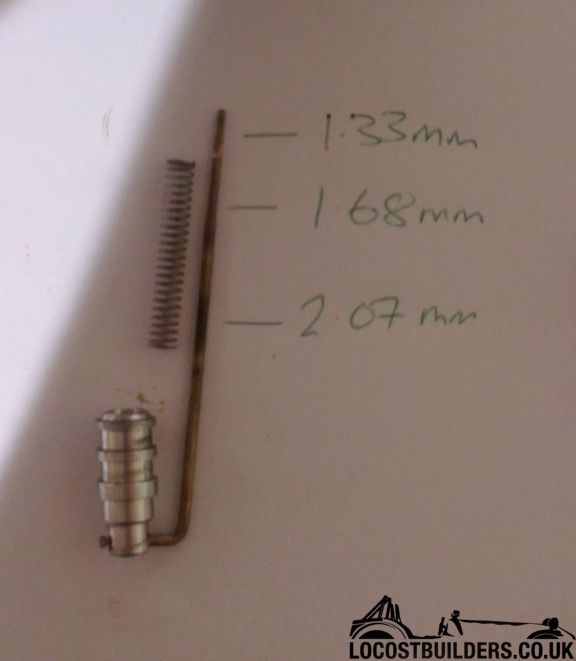
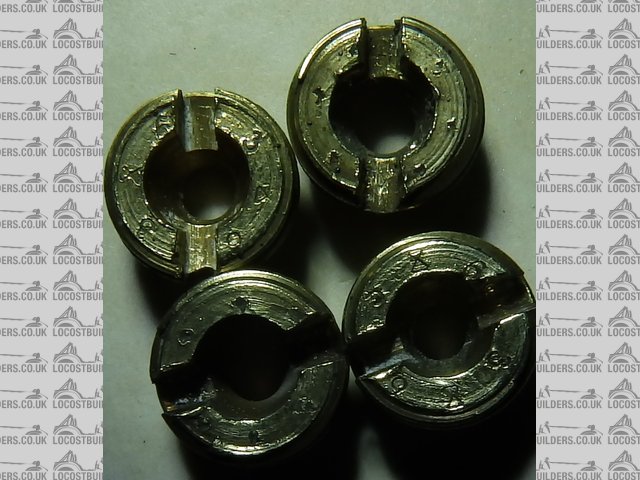
4. Rods: As image
I took the car out before doing this procedure and it did run okay. By the time the gentle 15min run came to a end it was beginning to cough out a bit of black smoke and small backfires. This has happened before and if I clean the plugs it will no doubt run fine.
I whipped all the plugs out on one side and I have photographed them. They pretty much look like this
I made a tedious video of the whole thing if more info is needed. The video was to help me put it back together. I am not a good camera man
Any help would be greatly appreciated.
I would be very interested in your recommendations SideCar and the offer of the rods/jets purchase.
https://www.youtube.com/watch?v=vcJlShKAB0c
1. I think the float heights are way out. By at least 3 or 4mm. I don't have a handy 7/16 drill bit but they are still out. Am I right in thinking I just bend the metal as per the manual?
2. Found a tiny sliver of metal that shouldn't be there.
3. How do you measure the jets accurately? I found the hole in the jet to be 2.1mm and about 2.4mm
4. Rods: As image
I took the car out before doing this procedure and it did run okay. By the time the gentle 15min run came to a end it was beginning to cough out a bit of black smoke and small backfires. This has happened before and if I clean the plugs it will no doubt run fine.
I whipped all the plugs out on one side and I have photographed them. They pretty much look like this
I made a tedious video of the whole thing if more info is needed. The video was to help me put it back together. I am not a good camera man
Any help would be greatly appreciated.
I would be very interested in your recommendations SideCar and the offer of the rods/jets purchase.
https://www.youtube.com/watch?v=vcJlShKAB0c
Last edited by irony on Thu Oct 01, 2015 7:11 pm, edited 4 times in total.
Hi Irony,
The picture of your floats indicates that the floats are set to close earlier than they are supposed to, this would actually lower the level of fuel in the bowls making the carb less likely to flood. I wonder if this has been done because the fuel pressure is too high for the float valves? The floats should be removed and the float valves checked for dirt as this will cause the carb to flood badly.
You don't normally measure the jets, they have a number stamped on them. The number is REALLY hard to read, I use a 40X loupe that I got off ebay...
http://www.ebay.co.uk/itm/LED-Illuminat ... 5d5c930b6b
You also need to get the numbers off the rods.
The jets may well be something like 386, the rods maybe 6552 (The two diameters being 65 thou and the tip being 52 thou)
Having said that 2.1mm X 40 (40 thou to 1mm) comes out at 84 thou. You can't get 84 thou jets but you can get 86 and 83 thou jets. (386, 383)
The secondaries that you measured at 2.4mm work out to be 94 thou, again you can't get these but you can get 95 thou jets (395).
Post up your findings, I can then tell you how your setup compares to the standard setup. I also do have some setup information for a 3.9 engine BUT I must admit that I think that it is well dodgy making suggestions over the web. The final settings depend on many things, not just the engine size. like I said before, an exhaust gas analyizer is the way to go. (along with knowing how the carb works).
Have a read of this, I wrote it ages ago, most of it is correct!...
The bit titled "Setting up the Edelbrock 500 Carburettor on a Rover V8"
http://how-to-build-a-pilgrim-sumo.wiki ... ing-system
I have had another look at the rods and jets
The Rods are 65-52
The Jets are more diffcult
The main jets have .386 written on them. The secondaries are completely unreadable. But they are bigger so I must assume they are .389.
I don't know what comes as standard in the Edelbrock so I don't know where I am on the little chart in the manual.
I have been reading your old posts Sidecar and they are full of good info on this carb - thanks.
I think that the secondaries will be 95 which is standard. The rods and primaries are standard.
Tonight I'll post up some combinations that you can try. (with caveats!)
My mate won't thank me for this, a while ago I sent him an email which details my current idea on how to set one of these carbs up, he uses an LC1 gauge and a vac gauge in the same way that I do. He also has my spreadsheet which allows you to compare any rod and jet setup with any other. Below is the email...
Checks that should be made before doing anything else:-
1. Check that the fuel pressure is no more than 6 PSI
2. Check that the fuel flow is capable of providing enough fuel for WOT. BHP=(Fuel flow in CC per min/4.7). Measure the flow for 30 seconds then times it by 2. Divide the figure by 4.7, the resulting number is the max BHP that could be made. You need the pump to be able to deliver 50% more fuel than is required. If 1 litre is required then the pump must deliver 1.5 litres per minute. By the way 1 litre of fuel per minute could make 212 BHP (1000/4.7) but I would want the pump to be able to deliver 1.5 litres for a 212 BHP engine.
3. Check that the air filter setup is suitable, the air filter stud gives an indication of the clearance. 50mm clearance being the minimum required.
4. Check that there is some sort of throttle stop, the carb must not be acting as the throttle stop as it will be damaged or the cable will break.
5. Check that the rubber bungs on the carb take off points are in good condition
6. Check that the throttle return springs are setup correctly, a poor setup will wear out the carb or kill someone!
7. Check that the ignition system and in particular the vac advance is set correctly, the Lucas dizzy really does not work well with the Eddy carb, you could disconnect the vac advance whilst working on the carb.
8. Take the top off the carb and make sure that the float bowls are clean, check the float heights. You can raise the floats 2-3mm which helps stop fuel surge when cornering and braking. Really you should clean out the carb if it looks dodgy! (including the idle screw circuits). Make a note of the rods and the jets in the primaries AND secondaries, also note the colour of the piston springs!
First phase, the idle circuit
Start the engine and let it fully warm up. Stop the engine and wind in each idle mixture screw, make a note of the turns. Then wind them both out to some arbitrary figure which is more than the figures that you noted, maybe wind them out three turns. Start the engine then slowly wind in each screw ¼ of a turn at a time, listen to how the engine responds, it may well speed up as the mixture strength gets near what the engine wants, at some point the bark will just start to drop from the exhaust, the engine may well slow down a few RPM. At that point wind each screw out ¼ of a turn. Set the idle speed then kill the engine. Wind each screw in and note the turns, if one is in ¼ more than the other then bring it out so they are both at the higher figure. The AFR may well be 12-13.5:1, it could be leaner but the figure does not really matter, the engine has ‘told’ you what it wanted, you just had to listen!
Second Phase, the cruise and acceleration circuit
Restrict how much the carb can open by some suitable means so that the primaries are open as far as they can before the secondaries start to open. (The primaries will be half open). You may want to disconnect the accelerator pump whilst setting this up so that you don’t flood the engine. Connect it back up once the ‘restrictor’ has been sorted out. Connect a vac gauge to the non-timed port of the carb. Take the car for a drive, get the owner to accelerate as hard as possible in 3-4th gear, make a note of the vacuum reading, the reading may well change as the revs change so you will have to judge the figure to a degree. Fit the LC1 gauge.
If the engine pulls 7” when accelerating you must fit springs which will lift the rods at the nearest higher level, you cannot fit springs that would lift at 6”, you must fit ones that would lift at 8”.
If during this test you are sure that the rods did lift because the correct springs are fitted you can make a note of the AFR. The ratio needs to be 12-12.5:1. If the AFR is not this then you must use the spreadsheet to work out a suitable combination that will work.
For the cruise test get the owner to drive at 50mph (not any slower as you could be running on the transition slots). The 50mph must be a steady state using as little throttle as possible, make a note of the AFR. It needs to be as lean as possible whilst maintaining throttle response, it should be at least 14.5-15:1. In fact most old V8 engines won’t go any leaner but you should keep leaning this circuit off until it is clear that you have gone too far, then go a one stage richer. (Bear in mind that we are not using Edelbrocks ‘stages’ of tune, they are rubbish!).
Once you have percentage figures of difference over the base setup then whenever you change one circuit you must check via the spreadsheet that the other circuit has not changed. Note that the spreadsheet is a very sensitive device, 1% difference will probably not be noticeable UNLESS you are going leaner on the cruise circuit, then that 1% might tip you over the edge! (Personally I would not want to run that close to the ragged edge on cruise because you might find that atmospheric conditions then take start to have an effect).
Third Phase, WOT
Remove the restriction that stopped the carb from fully opening, set the throttle stop up so that the carb does fully open BUT make sure that the carb and the throttle cable is not being stressed due to incorrect adjustment.
Get the owner of the car to drive the car at WOT, you really needs to be at least 4 gear, the revs need to be over 4k RPM (this will be pretty fast in most cars!). The AFR needs to be 12.5-12.8:1, it does not want to be in the 13’s or leaner, an over rich mixture at WOT will lose you a couple of horse power, a lean mixture will lose you 10-20 BHP. Keep it rich!
The spreadsheet does not help when setting up WOT, just change the jets and the do another test run.
Fourth phase, acceleration pump
Personally I think that the pump is quite a crude device, I’d try and set it up so that it pumps the minimum amount of fuel it can without there being a lean bog when you boot the throttle in a reasonably high gear. Try flooring the throttle in 3rd gear from 2-3kRPM, feel for a bog and use the LC1 to determine whether it was a rich or lean bog. Adjust the accelerator pump to correct the problem.
Last edited by sidecar on Sat Oct 03, 2015 9:20 am, edited 1 time in total.
OK, below is a load of primary jets and rods that you could try, really I don't even like giving jet and rod combo's out over the web. The percentage figures are how much leaner the setup is compared to the standard setup on cruise and on the acceleration power step. Now really the ONLY way to set a carb up is by monitoring the exhaust gas, plug reading or going by feel is at best useless! (well you could set the cruise up by feel by going leaner and leaner until the engine response goes bad then go one stage richer but you need an LC1 or similar for the power setp and WOT)
I can put you in touch with my mate who has most of the rods and jets, he will charge you a fee for them but then you can return them if required for any other jets and rods that you wish to try as long as you pay for the post.
83 64x54.....12%, 15% (one off rods, the last 3.9 that I worked on used this setup)
86 69X52.....16.9%, 0.0% (One off rods, my 4.6 uses this setup)
86 68X57.....12.5%, 11.6%
83 65X52......15.9%, 10.8%
86 67X55.......8.3%, 6.8%
83 65X47.......15%, 0.2%
83 65X52.......16%,10.8%
