
Hi All
For quite sometime now it has been thought by myself and others that my air filter is way to small for the engine to breathe properly.
So sometime ago I made a caddy style air filter which turned out be be a total failure and also looked crap so I have come up with a new design which will be part grp part tube and of course 3 parts filter.
This should allow the motor to breath and also look quite good under the bonnet.
Pictures of progress so far will be posted later.
cheers
P
Monkey business
Moderator: phpBB2 - Administrators
Its now over an hour later!!!
Wheres the pics then ??
Wheres the pics then ??
Perry Stephenson
MGB GT + Rover V8
9.62 @ 137.37mph
Now looking for 8 seconds with a SBC engine
Right then
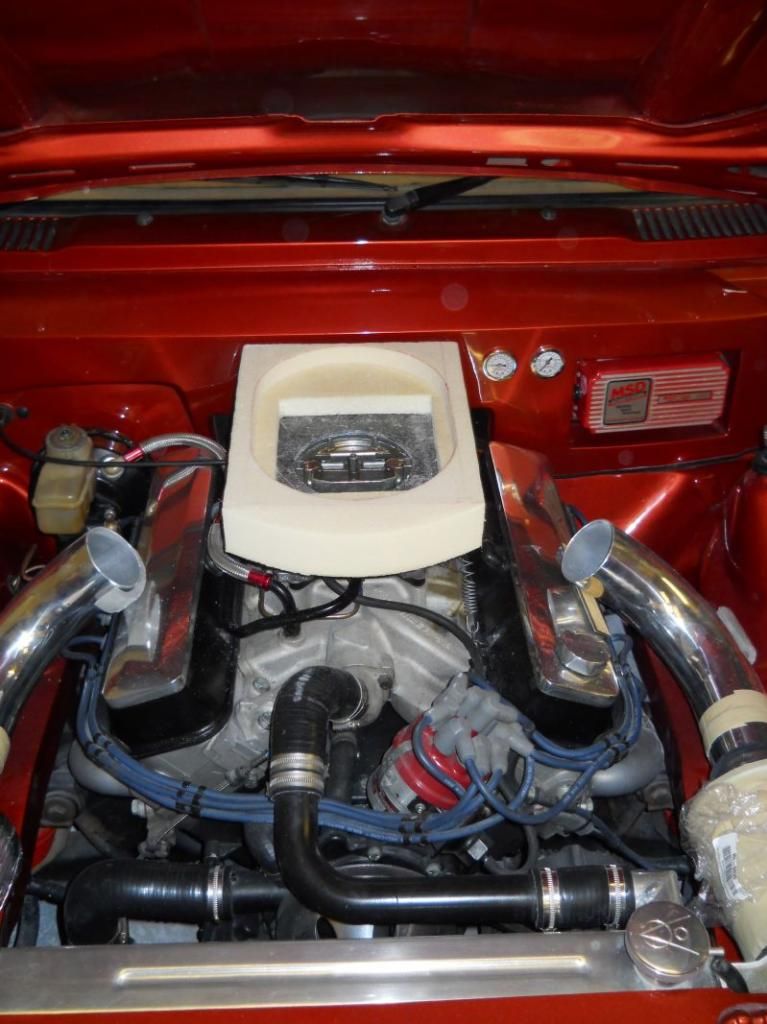
First lot of pics and a bit of my rambling as usual.
I had an old fibreglass lid kicking about and thought that that would make a good base for some brackets and load spreading washers so made a template and set too with the jigsaw.

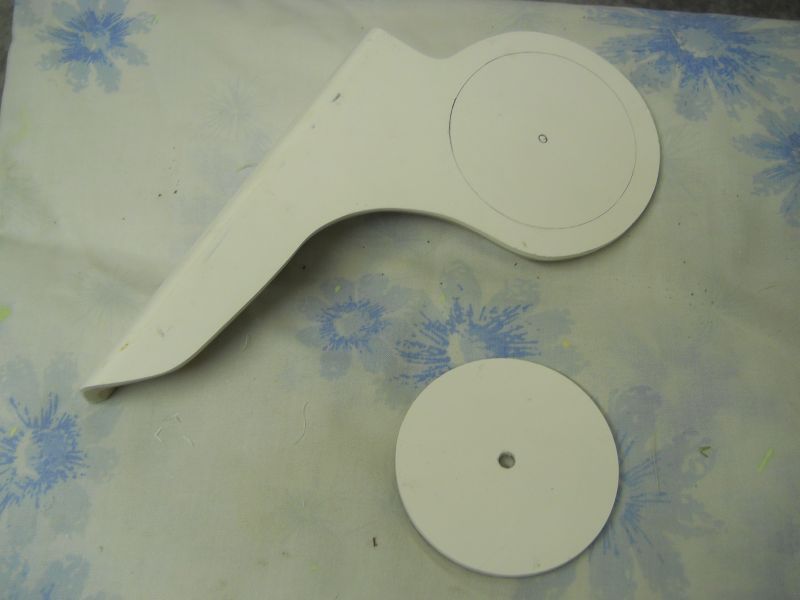
I then drilled and tapped the sides of my rad and then straight through the front of the filters and bolted everything up.
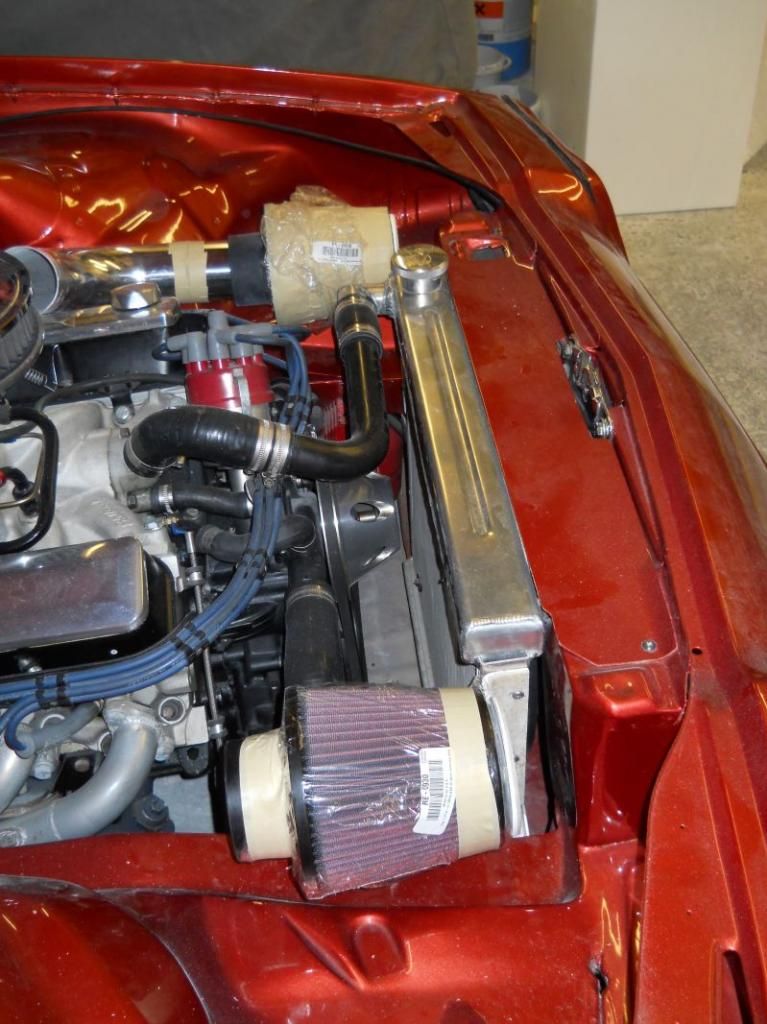
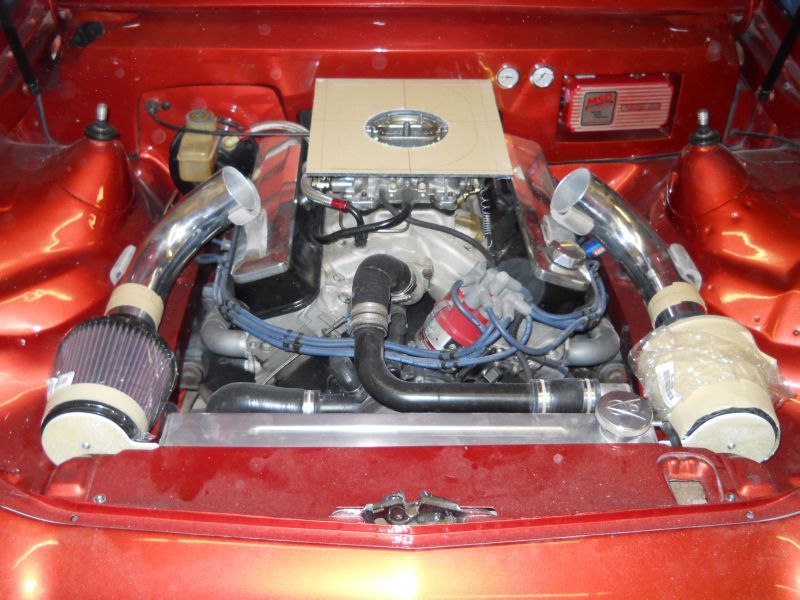
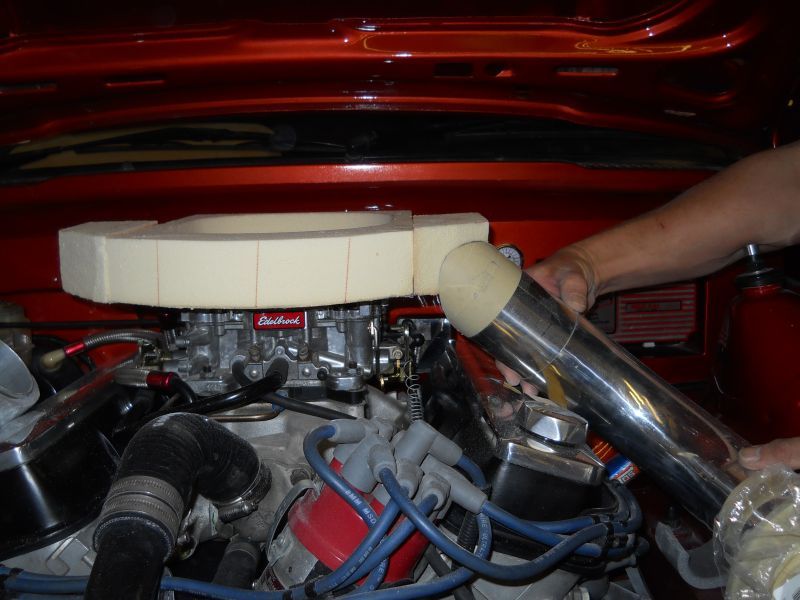
Once I had done that I cut some of the 3"ali tube that I bought along with the 90 degree bends and made up two intake runners.
In between doing that a base for the filter was made up from a bit of perspex and spaced and sat on top of the carb.
As I will be making the filter box from grp perspex is great for moulding off.
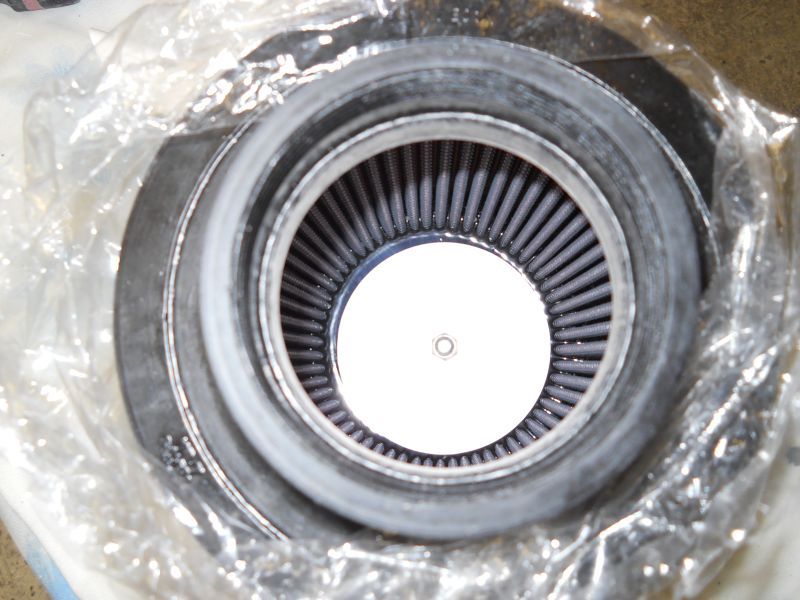
The top of the filter housing is going to be a K&N extreme filter top which will drag air in from the scoop at the back of my bonnet thus (hopefully )creating a venturi effect and help to pull air in from the front two filters.
This all might seem a bit of an overkill but getting this to work properly and look right is paramount to me.
You could argue that the filter I already have is ok but it just does not flow enough so that is why I am doing this.
Now Perry should be happy because he's got some pictures to look at and I will catch you all a bit later (those of you that have'nt dozed off already that is)
cheers
P
First lot of pics and a bit of my rambling as usual.
I had an old fibreglass lid kicking about and thought that that would make a good base for some brackets and load spreading washers so made a template and set too with the jigsaw.

I then drilled and tapped the sides of my rad and then straight through the front of the filters and bolted everything up.


Once I had done that I cut some of the 3"ali tube that I bought along with the 90 degree bends and made up two intake runners.

In between doing that a base for the filter was made up from a bit of perspex and spaced and sat on top of the carb.

As I will be making the filter box from grp perspex is great for moulding off.
The top of the filter housing is going to be a K&N extreme filter top which will drag air in from the scoop at the back of my bonnet thus (hopefully )creating a venturi effect and help to pull air in from the front two filters.
This all might seem a bit of an overkill but getting this to work properly and look right is paramount to me.
You could argue that the filter I already have is ok but it just does not flow enough so that is why I am doing this.
Now Perry should be happy because he's got some pictures to look at and I will catch you all a bit later (those of you that have'nt dozed off already that is)
cheers
P
-
unstable load
- Top Dog

- Posts: 1278
- Joined: Mon May 04, 2009 6:53 am
gelmonkey wrote:Hang on you impatient child.
I'm old and these computer mejigs confuse me somewhat and it's been a long time since I last posted my crap so need to take it slow.
An old fart like you should understand this
Also I've only just come in from the garage so give a man a chance will ya!
p
Paul!
I've now sussed out computers. When they dont work all you do is turn them off, and then back on again
Perry Stephenson
MGB GT + Rover V8
9.62 @ 137.37mph
Now looking for 8 seconds with a SBC engine
Mikekiwicar wrote:Hi Paul
I thought I should mention this so you can give it your full attention ASAP, there seems to be some dust in your engine bay, on the cover over the top of the radiator!
Best regards
Mike
Thanks so much for pointing out my failings in not keeping the car/engine bay clean and will attend to it before another seconds work is undertaken on the induction system.
Perry
It's not the computer that needs to be turned on and off it's my brain as it struggles to keep up most days!
But you did get your pictures mate.
Clean engine bay (before my friend and carer point out any further failings) and more progress tomorrow evening.
P
"Mike
Thanks so much for pointing out my failings in not keeping the car/engine bay clean and will attend to it before another seconds work is undertaken on the induction system."
Hi Paul
Thanks for that, after all where would I eat my dinner with all that dust about! In that condition it can only be the worlds second cleanest engine bay
What colour is that, and I don't mean "orange" what colour code is it? how is it built up? Is it 27 layers of alternate orange and yellow candy over gilt base? is it something that could be done in a more coppery hugh?
yes again I dish out abuse then ask for info. . . you should be used to it by now
Best regards
Mike
poppet valves rule!
Hi Mike
I know that the colour is a Nissan standard paint and it is called Autumn Sunburst.
As I understand it there are 5 coats of paint with each one being flatted back before the next one was applied and then a couple of coats of laquer before a final colour sand and polish and yes it was expensive but I think worth every penny (strangely Mrs Monkey thought I was nuts spending that amount of money on a paint job but I could'nt see the problem myself hee hee).
Now I must go and clean the car before I get into more trouble with you.
cheers
P
Hi Paul
It is a loverly colour, and I bet there wasn't a single nissan that left the factory that looked like that, real depth!
TBH if that can be done with "standard" factory colours I will go back and look at a rather nice "copper/bronze" colour I saw on a fiat a while ago. . .
Now get dusting!
Best regards
Mike
poppet valves rule!
Ok
So here's the next bit then.
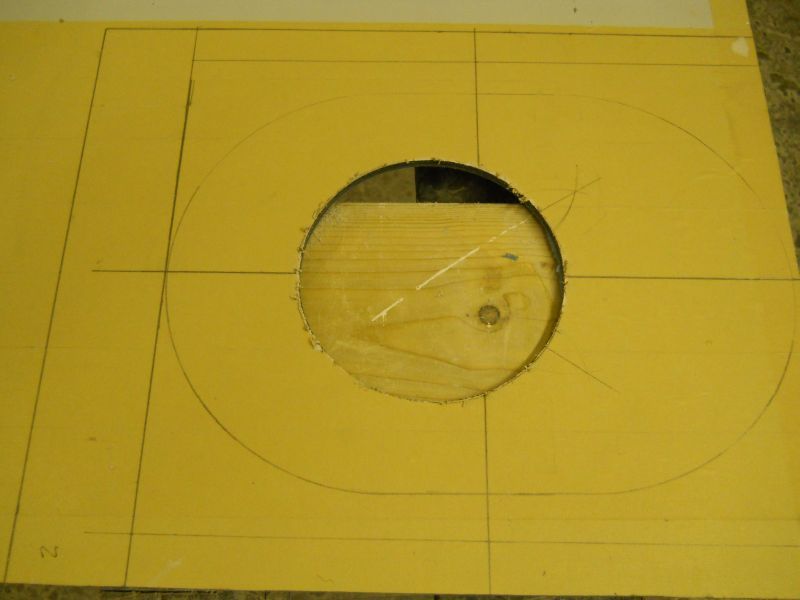
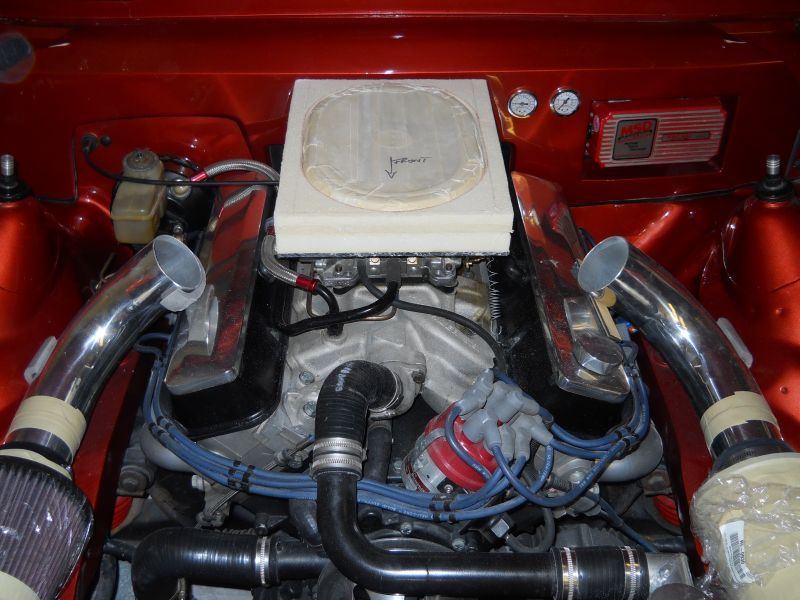
With my base made it is now a question of getting exactly the right depth for the intake as I only have 185mm from the inlet manifold to the underside of the forward end of the bonnet detail so space is very limited indeed.
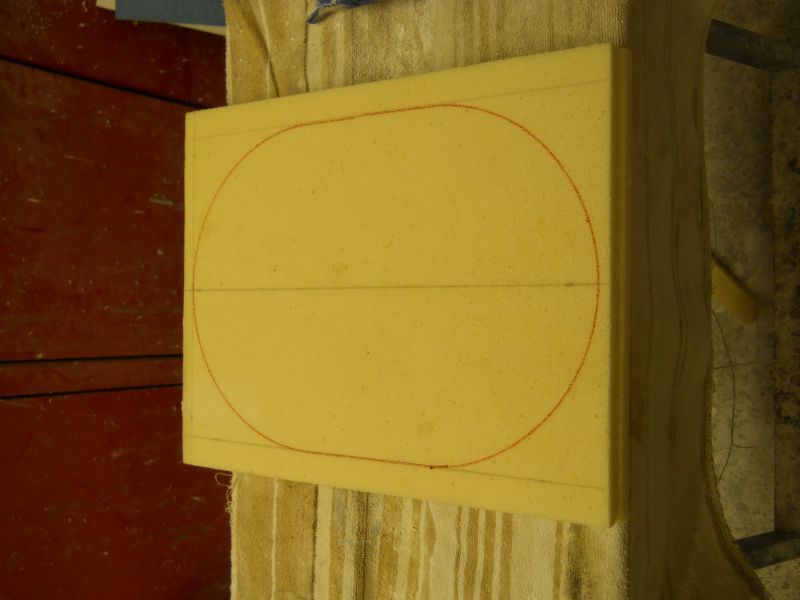
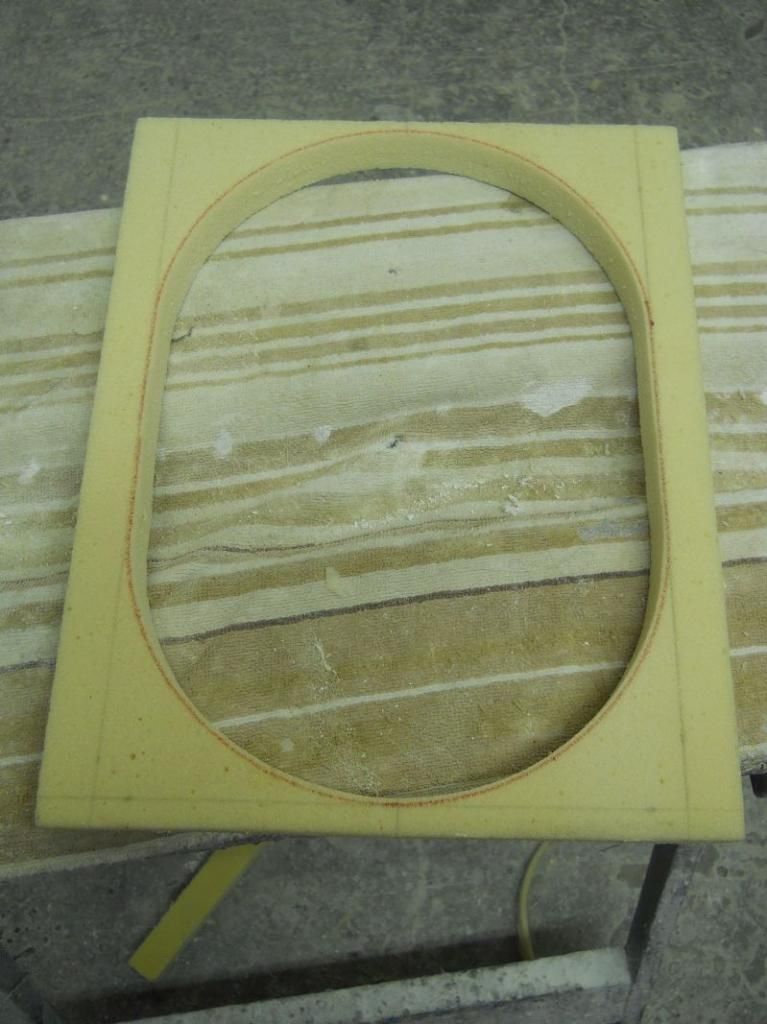
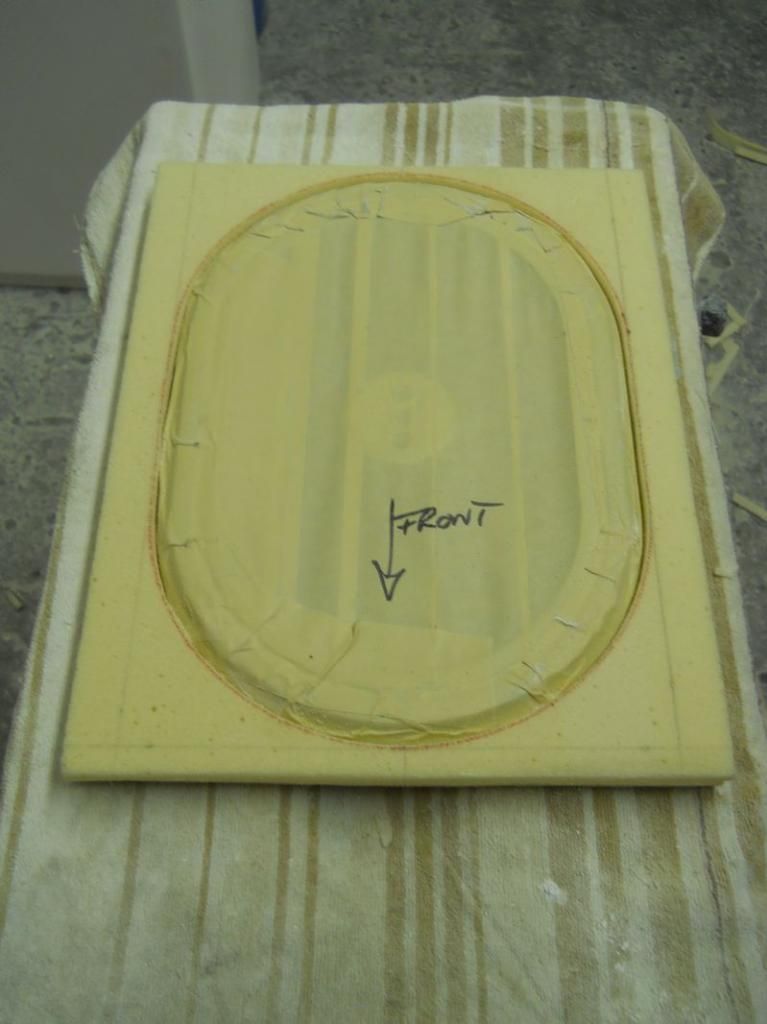
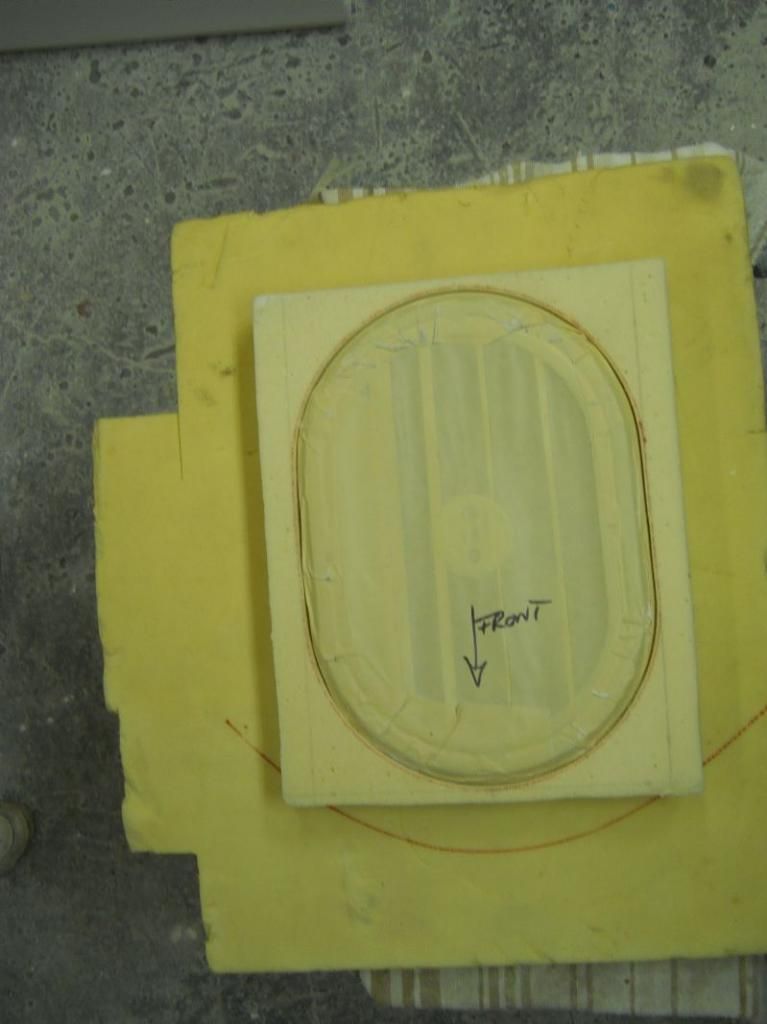
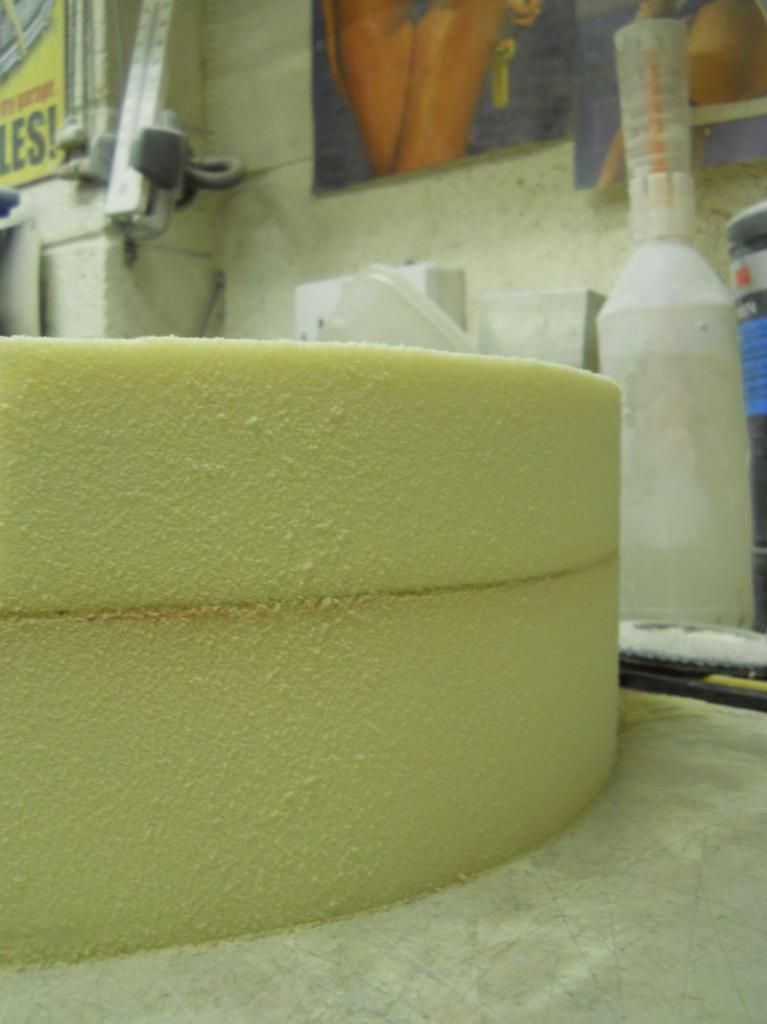
With that in mind and knowing that my original filter sits in just nice I took some closed cell PU foam sheets and cut them to sit on the perspex baseplate.
After bonding them together and transferring all my measurements I then scribed around the original filter top.
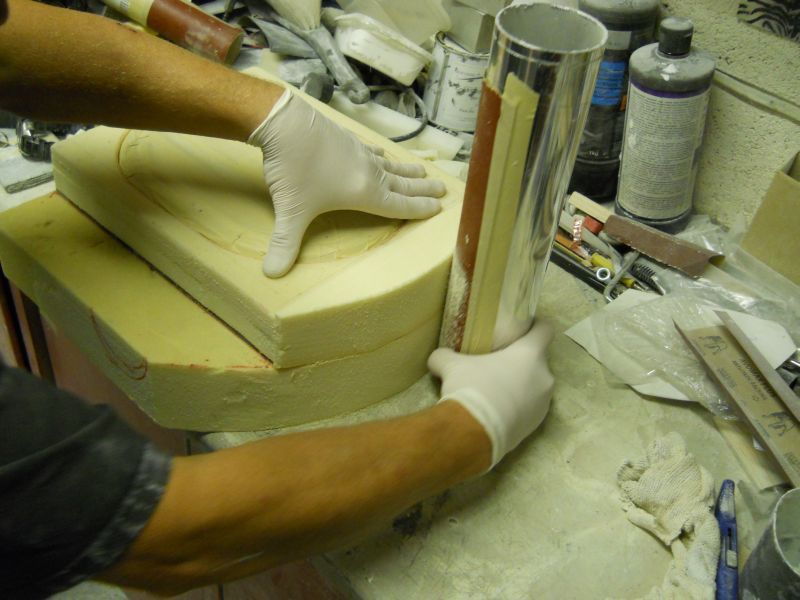
Next is was a case of cutting the center out roughly with a Stanley knife to get the basic shape being careful to not go over the lines.
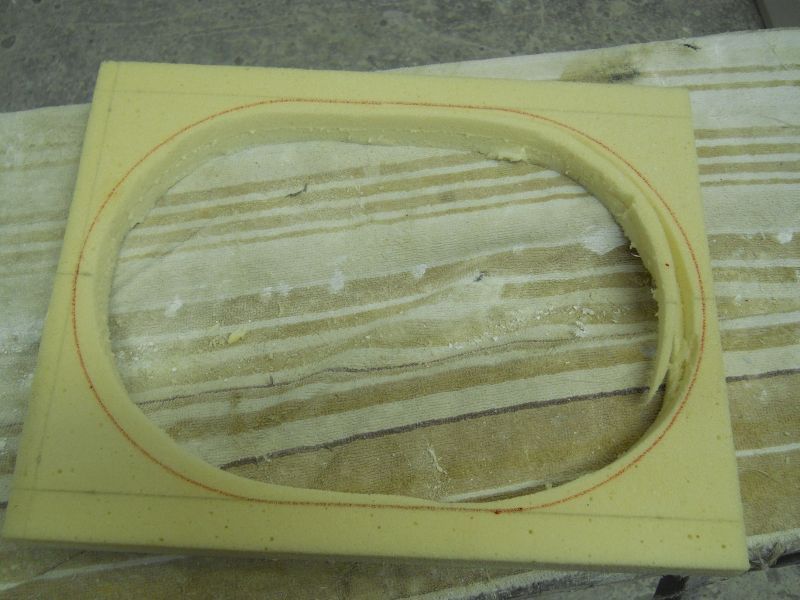
I then taped some 120 grit paper to an old silicone tube and final finished the cut out.
If you stick the paper completely square to the bottom of the tube and the sand with the tube upright on a flat surface you are sure of a perfect 90 degree edge on what you are sanding.
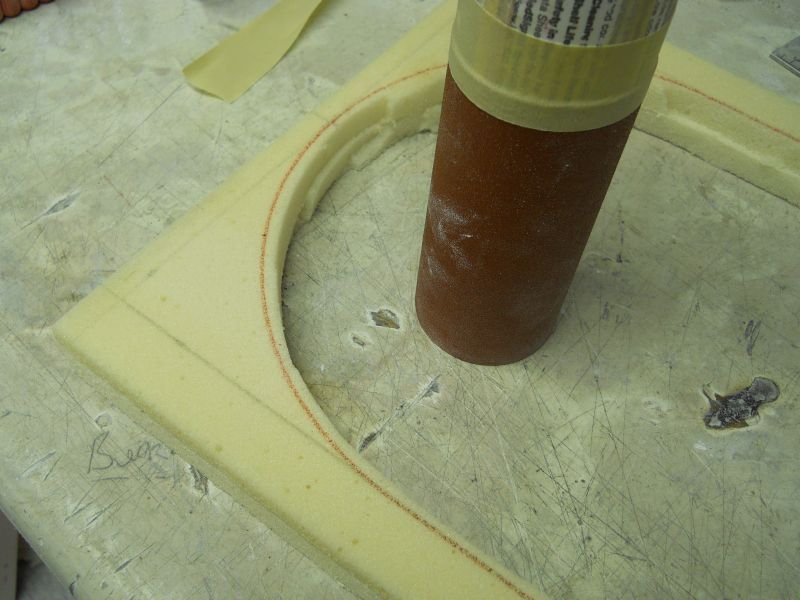
10 minutes later and we have a perfect fit for the new filter top.
With the the top and bottom now done I took some more foam and made a center section that would allow the filter top to sit square and also to be the right depth bearing in mind the limited space and ended up with this.
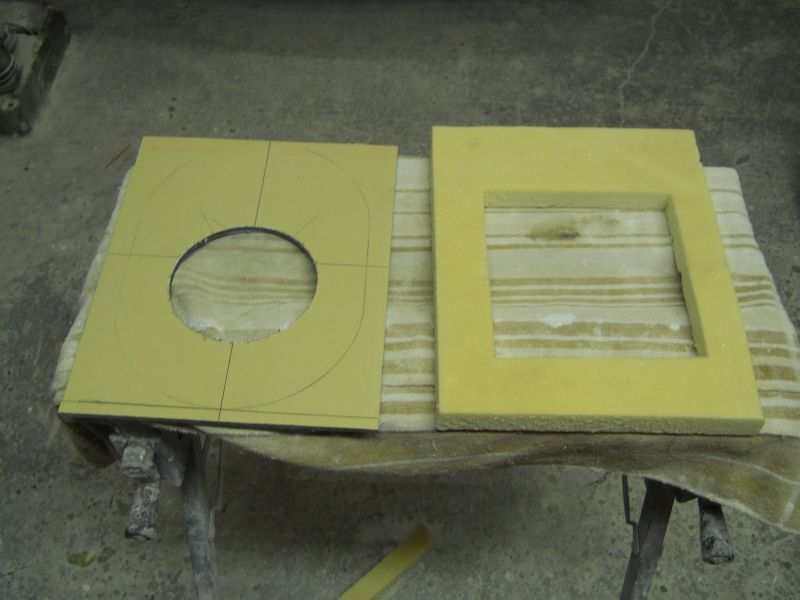
As you can see clearly all I have here at the moment is slightly bigger than what I had on originally so greater depth and a way of connecting the intakes to the box are the next concern.
A large block of 3" foam was taken from the stock pile scribed and cut to shape.
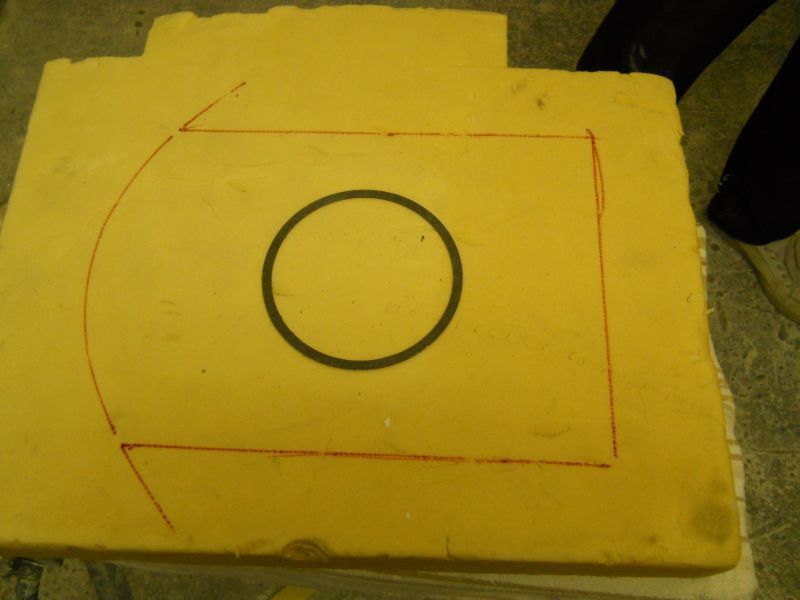
An off cut of the thinner foam was then bent to form the same curvature of the airfilter itself which keeps things looking quite nice.
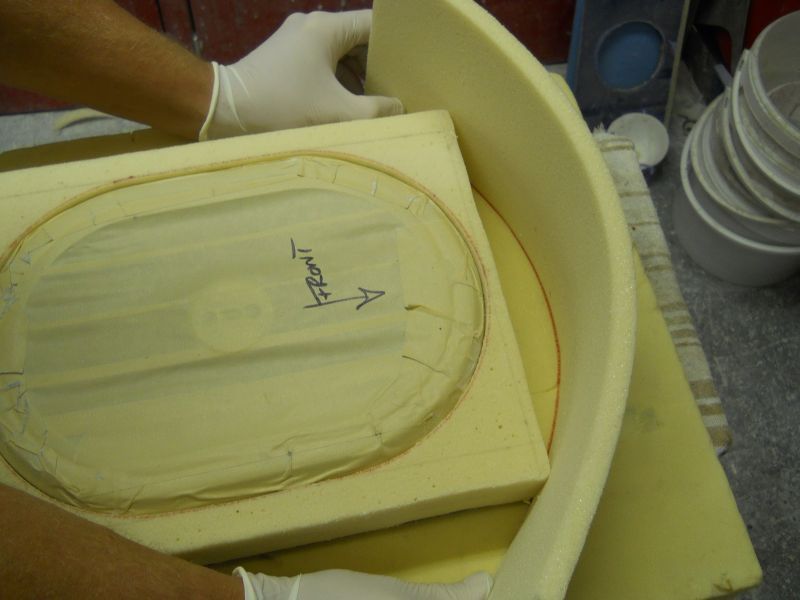
Can you believe it, more foam was then bonded and shaped to give this.
At this point you can see the middle section of the box top and how the filter top is supported.
It might be worth mentioning at this point that I am using the foam as
1. I have it here in stock from previous projects .
2 It is incredibly easy to use and shape.
3 Very simple to mould off
4 It costs me nothing (always good)
Wearing gloves when using this foam is always a good idea.
When sanded it leaves very small particles on your skin and if you rub your face it very easily gets into your eyes (been there done that) which makes things uncomfortable for a while.
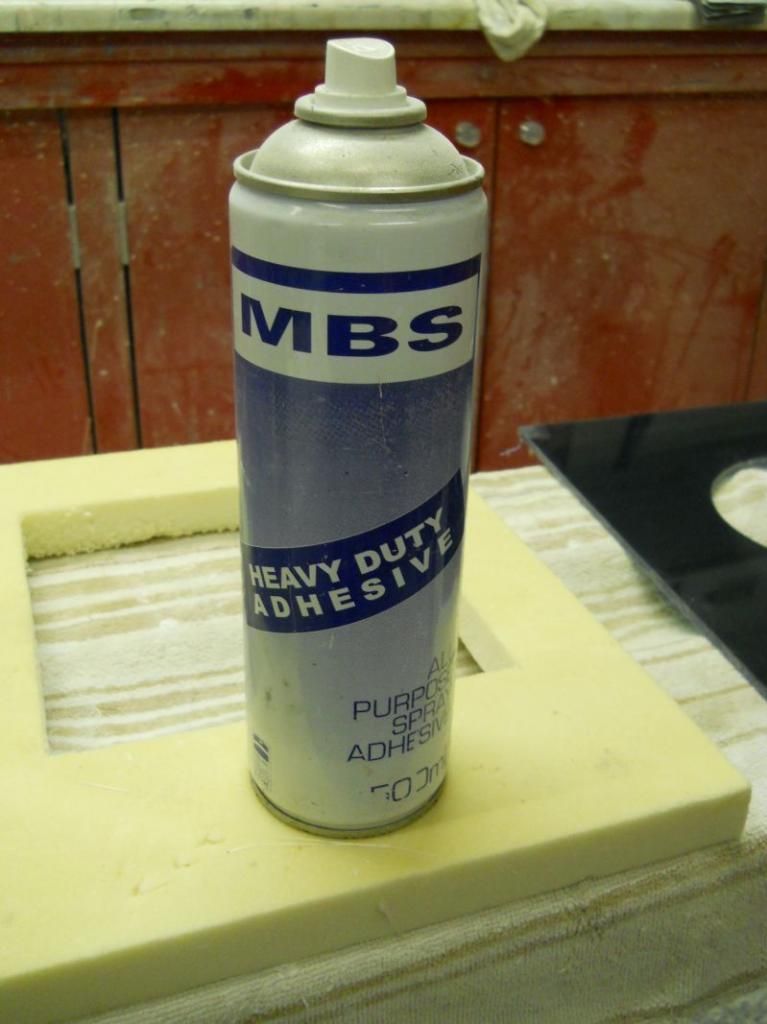
With the 3" foam already cut and roughly shaped the top section was bonded to it using some marine glue ("Strong stuff", that will make sense to some and not to others) and we end up with this.
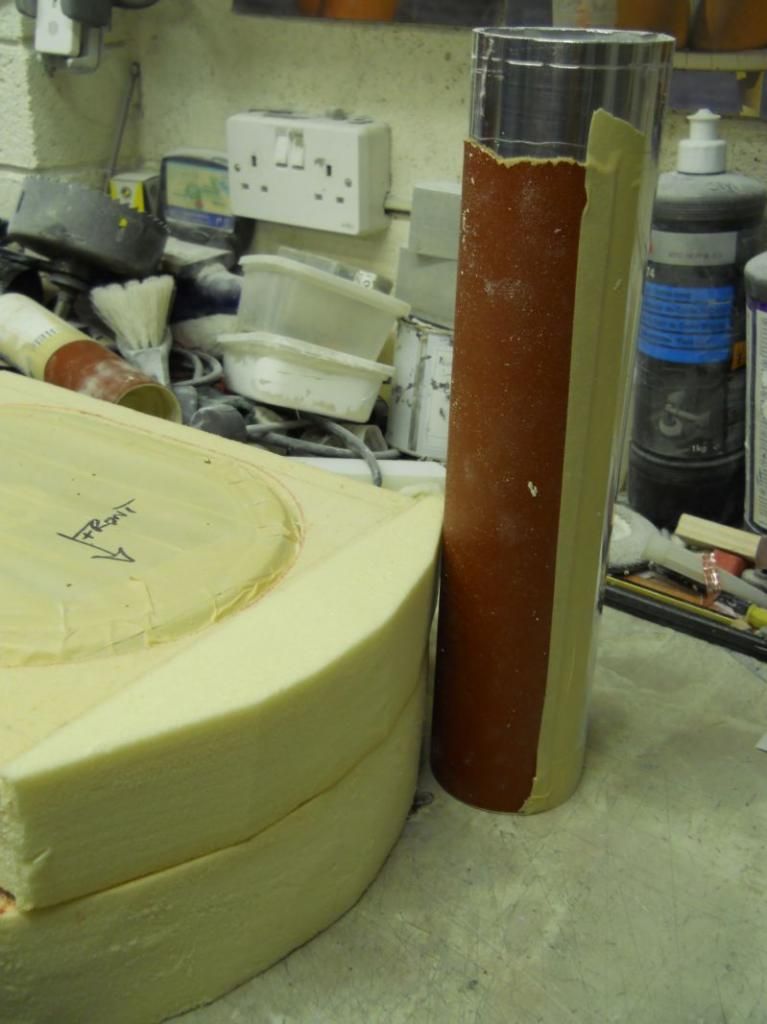
Using a section of the ali pipe I employed the same sanding method as earlier and spent 10 minutes shaping to end up with this.
Then all I needed to do was to add two sections to the sides to make wings for the tubes to fit into.
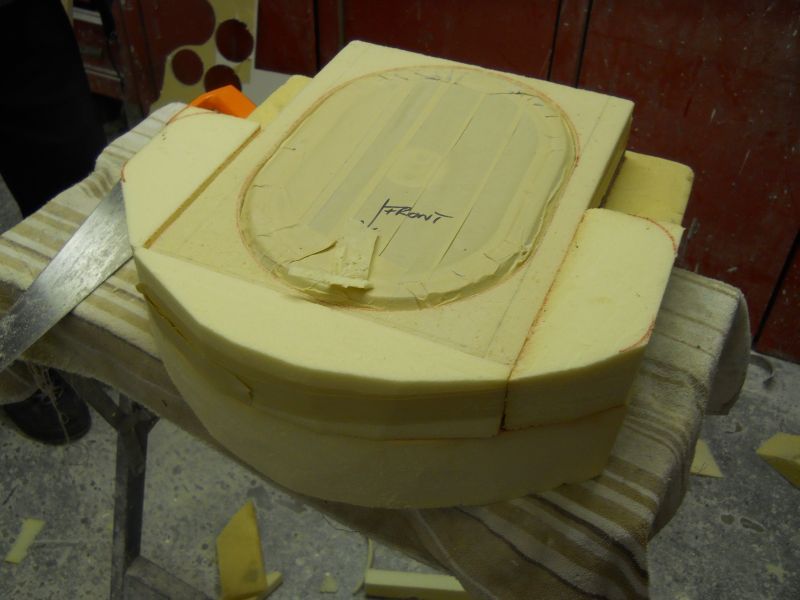
A rough test fit was done earlier in the evening and as long as I'm careful I should end up with the intake tubes flowing in something like this.
Thats it for now so if time allows I will be back on the case tonight and show progress again tomorrow.
Cheers for now
P
So here's the next bit then.
With my base made it is now a question of getting exactly the right depth for the intake as I only have 185mm from the inlet manifold to the underside of the forward end of the bonnet detail so space is very limited indeed.
With that in mind and knowing that my original filter sits in just nice I took some closed cell PU foam sheets and cut them to sit on the perspex baseplate.

After bonding them together and transferring all my measurements I then scribed around the original filter top.

Next is was a case of cutting the center out roughly with a Stanley knife to get the basic shape being careful to not go over the lines.

I then taped some 120 grit paper to an old silicone tube and final finished the cut out.
If you stick the paper completely square to the bottom of the tube and the sand with the tube upright on a flat surface you are sure of a perfect 90 degree edge on what you are sanding.

10 minutes later and we have a perfect fit for the new filter top.


With the the top and bottom now done I took some more foam and made a center section that would allow the filter top to sit square and also to be the right depth bearing in mind the limited space and ended up with this.


As you can see clearly all I have here at the moment is slightly bigger than what I had on originally so greater depth and a way of connecting the intakes to the box are the next concern.
A large block of 3" foam was taken from the stock pile scribed and cut to shape.


An off cut of the thinner foam was then bent to form the same curvature of the airfilter itself which keeps things looking quite nice.

Can you believe it, more foam was then bonded and shaped to give this.

At this point you can see the middle section of the box top and how the filter top is supported.
It might be worth mentioning at this point that I am using the foam as
1. I have it here in stock from previous projects .
2 It is incredibly easy to use and shape.
3 Very simple to mould off
4 It costs me nothing (always good)
Wearing gloves when using this foam is always a good idea.
When sanded it leaves very small particles on your skin and if you rub your face it very easily gets into your eyes (been there done that) which makes things uncomfortable for a while.
With the 3" foam already cut and roughly shaped the top section was bonded to it using some marine glue ("Strong stuff", that will make sense to some and not to others) and we end up with this.


Using a section of the ali pipe I employed the same sanding method as earlier and spent 10 minutes shaping to end up with this.


Then all I needed to do was to add two sections to the sides to make wings for the tubes to fit into.

A rough test fit was done earlier in the evening and as long as I'm careful I should end up with the intake tubes flowing in something like this.

Thats it for now so if time allows I will be back on the case tonight and show progress again tomorrow.
Cheers for now
P
-
unstable load
- Top Dog
- Posts: 1278
- Joined: Mon May 04, 2009 6:53 am
Well yesterday was a bit of a washout to be honest.
I spent a little bit of time last night working on the thicker section and when I dummied it it up it looked absolutely shocking, almost like someone had put a bin on top of the motor so that wont do.
However if you don,t try you don't know so more time was spent working on the shape and I think I now have something that will be worthwhile in making but it does need a bit more effort so keep watching and if anyone has any idea's or comments (good or bad) then please feel free to say because I won't be offended.
Dave
I am no expert with this kind of set up but from what I have read and have been told by Kiwicar and others is that linear air flows much faster and smoother than turbulent air so getting a good run with as little bends as possible will increase airflow so that is my ultimate aim.
The cone filters are 6" K&N's the top filter is a 12"K&n and the tubes are 3" diameter.
In theory this will all work well together it's just a case of me having all the gear but only some idea (at the moment).
Even making the mould for the airbox itself is going to be a challenge because of its shape so that may go south as well even though I have some glassing expierience.
cheers
P
