Will this device be fitted for Retro Show Mr Monkey
Monkey business
Moderator: phpBB2 - Administrators
He does make it look easy Eh Stevie??
Will this device be fitted for Retro Show Mr Monkey
Will this device be fitted for Retro Show Mr Monkey
Perry Stephenson
MGB GT + Rover V8
9.62 @ 137.37mph
Now looking for 8 seconds with a SBC engine
-
stevieturbo
- Forum Contributor

- Posts: 3979
- Joined: Sat Nov 18, 2006 6:22 pm
- Location: Northern Ireland
-
unstable load
- Top Dog

- Posts: 1278
- Joined: Mon May 04, 2009 6:53 am
Hi John
Am fine honestly and have not been stopped by it at all
Really keen to get on with my filter project but have to wait for the cure to do its stuff
All but out of time for the post curing but am still going to try and do it before beyond practical
Work has to take priority as always and it's still crazy busy so not too much time spare just now
Be back on it soon with more rambling and pictures
Cheers
P
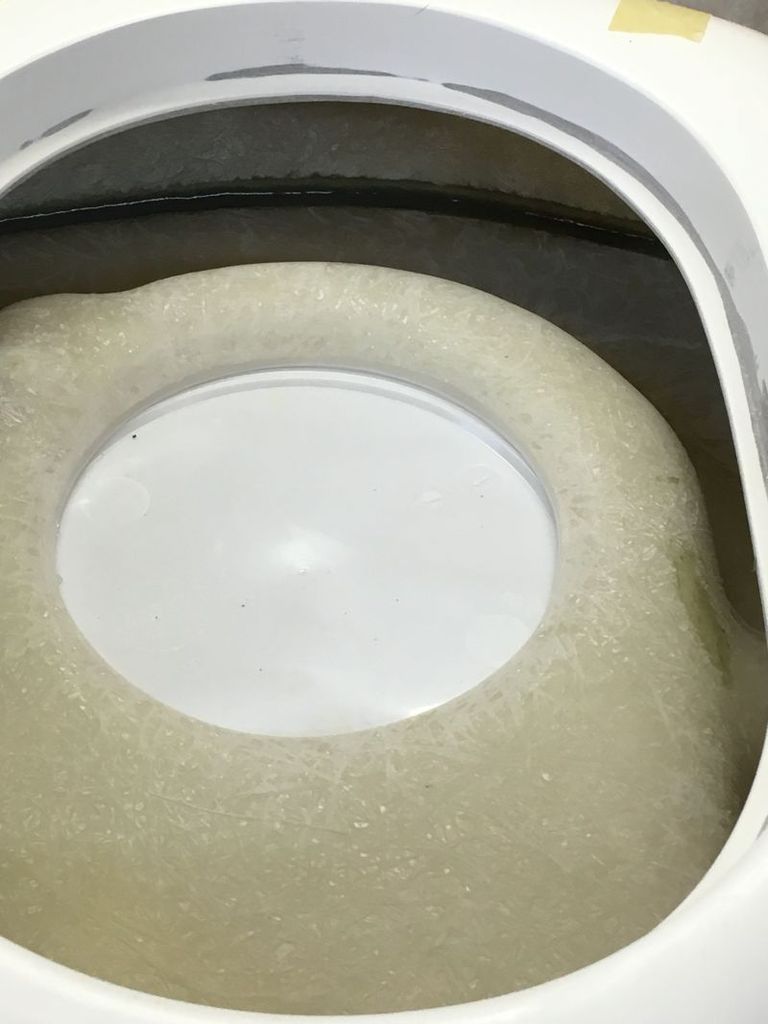
Well, been at it again and have made some more progress with this project of mine.
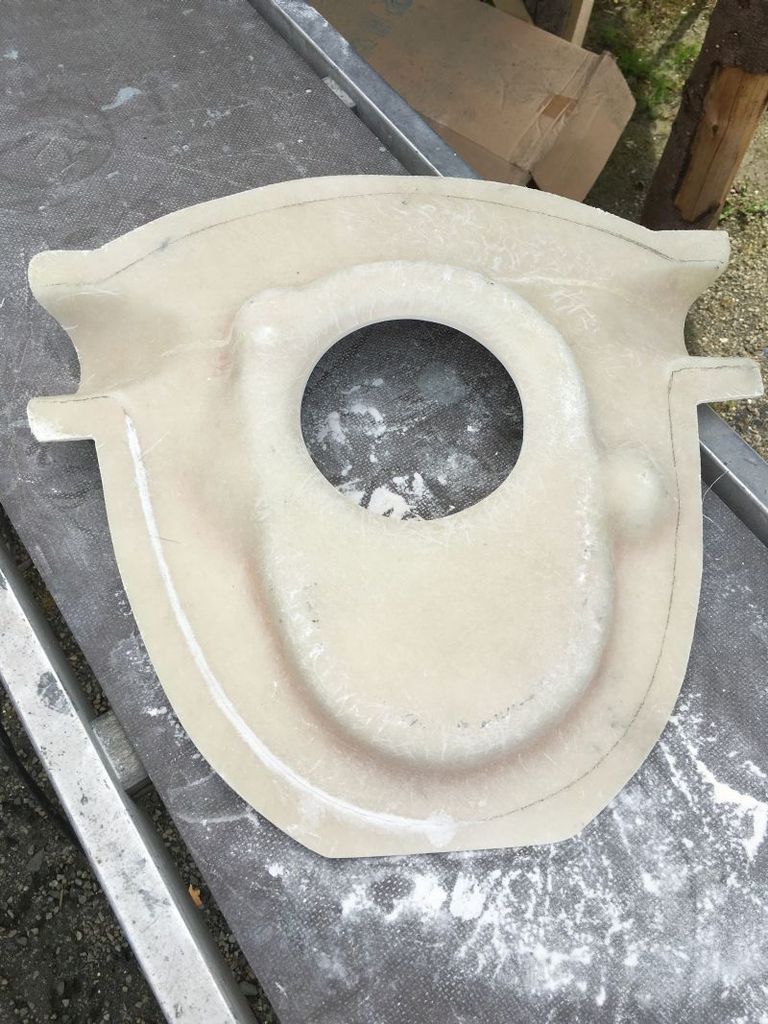
After losing the window for post curing on both sections it was decided that as it has been really quite warm down here that it would be okay to pop the top section out and see what it looked like.
So after cutting out the gash section in the middle and sanding back to the parting lines and doing the same all around the top I ended up with this.

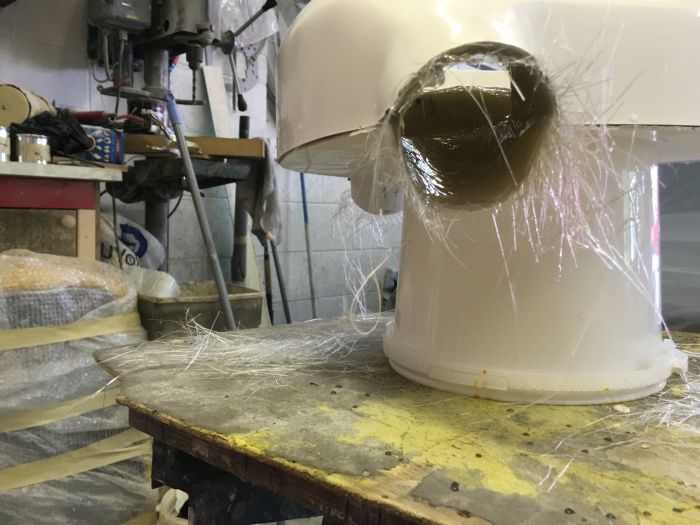
Then very carefully as sharp things and me have not been friends recently I gently tapped a stanley blade between the mould and the actual panel and then slid body filler spreaders all around the edges and pushed them down into the mould as far as they would go.
The sounds a mould makes as its release can be a bit unnerving but dont worry as it will make cracking popping and sucking sounds all over the place.
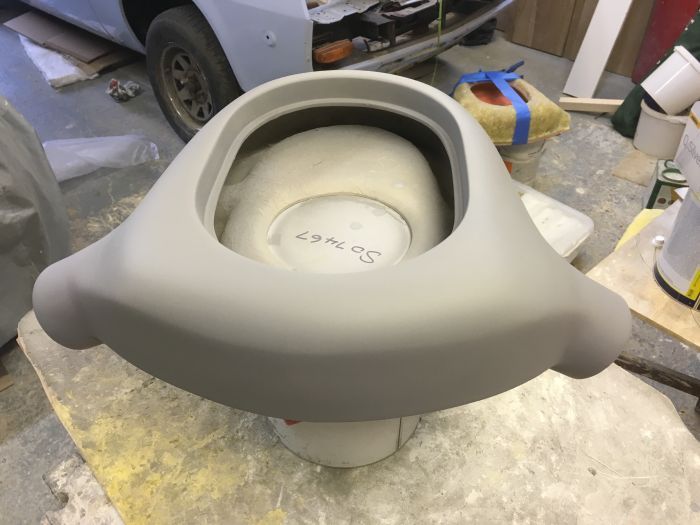
Once the area for the filter had released I knew it was going to be okay and the top section slowly came out.
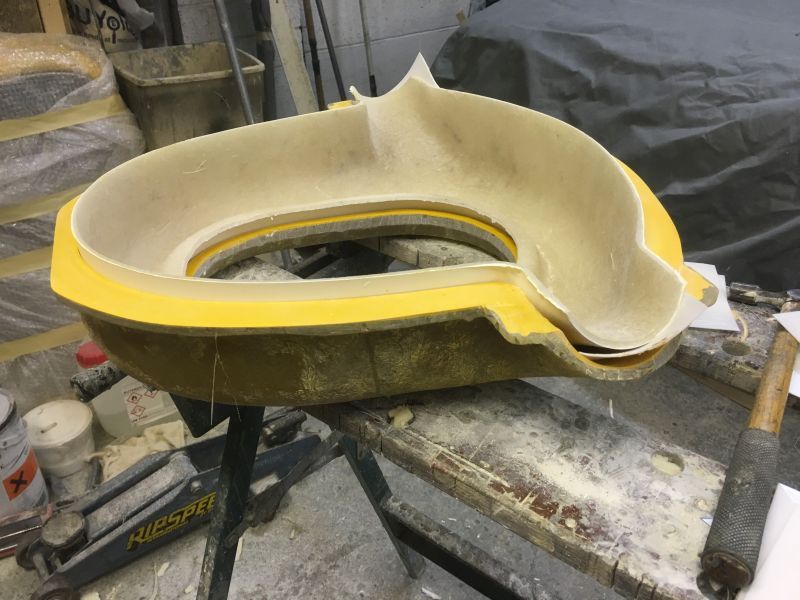
As you can see form this next picture the damage to the mould was very small with only a few little bits of mould gel coming away.
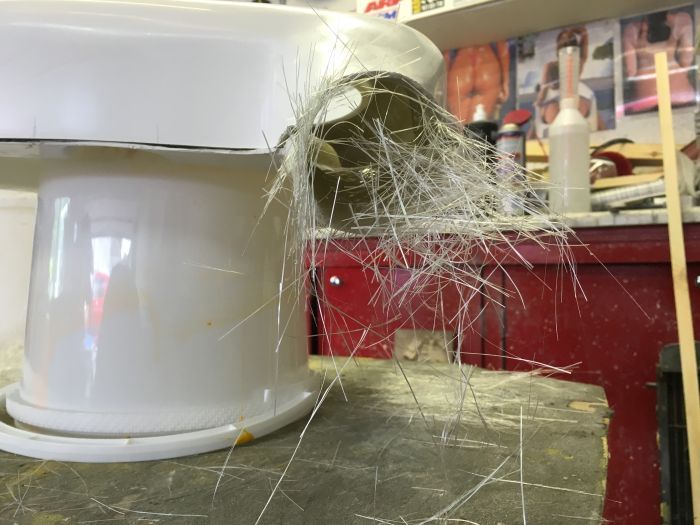
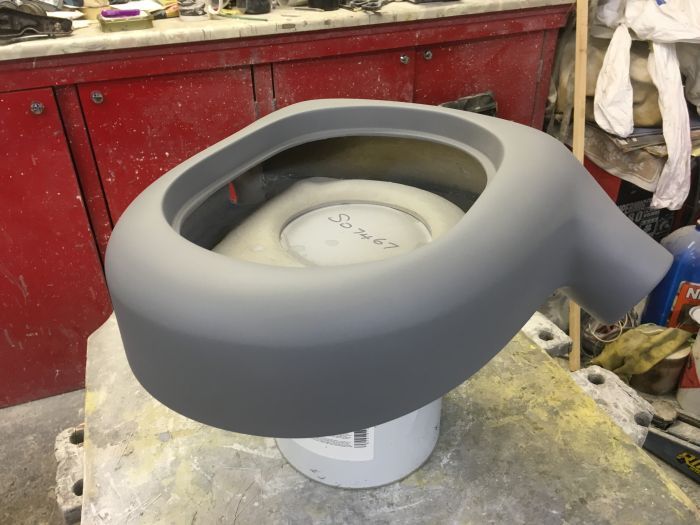
Next it was the turn of the lower section and using exactly the same procedure I ended up with this.
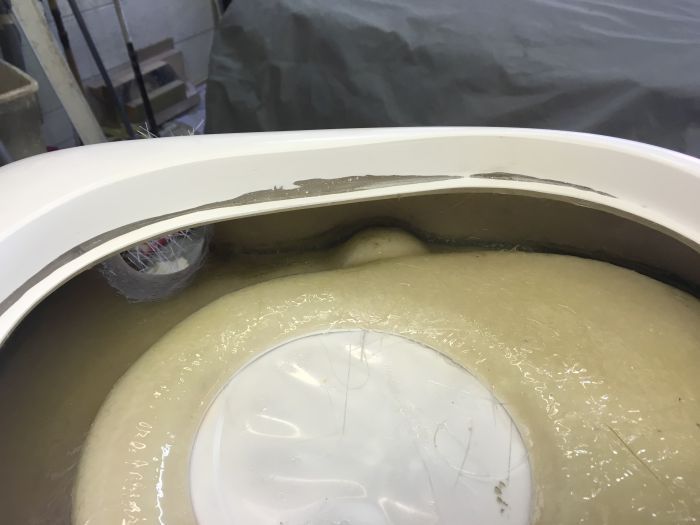
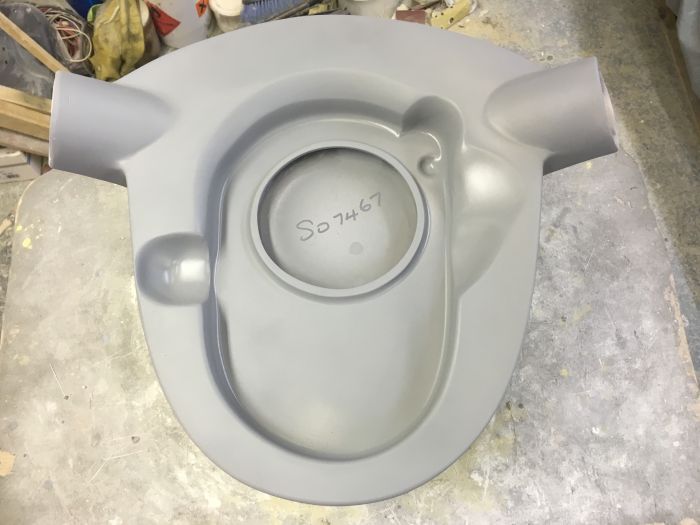
Sitting the top section on the base I drew around that and then cut off the excess.
Having sat the top and the bottom together it was always going to be a case of making a relief on the base for the top to sit on so out with the Dremel and a small rebate was made all the way around the base.
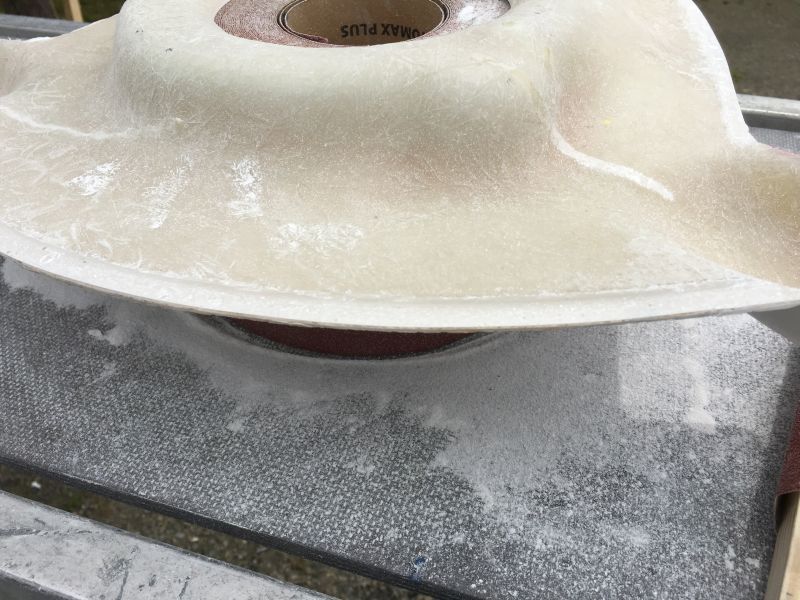
After a bit of messing about I got the two sections to sit fairly well together.
I need to shave a bit off on the filter rebate area so that it will sit in nicely but we are looking rather good now and hopefully before not to long both sections will be bonded together and I can get to finishing this off at last.
more again very soon
cheers
P
After losing the window for post curing on both sections it was decided that as it has been really quite warm down here that it would be okay to pop the top section out and see what it looked like.
So after cutting out the gash section in the middle and sanding back to the parting lines and doing the same all around the top I ended up with this.

Then very carefully as sharp things and me have not been friends recently
The sounds a mould makes as its release can be a bit unnerving but dont worry as it will make cracking popping and sucking sounds all over the place.
Once the area for the filter had released I knew it was going to be okay and the top section slowly came out.


As you can see form this next picture the damage to the mould was very small with only a few little bits of mould gel coming away.

Next it was the turn of the lower section and using exactly the same procedure I ended up with this.

Sitting the top section on the base I drew around that and then cut off the excess.

Having sat the top and the bottom together it was always going to be a case of making a relief on the base for the top to sit on so out with the Dremel and a small rebate was made all the way around the base.

After a bit of messing about I got the two sections to sit fairly well together.
I need to shave a bit off on the filter rebate area so that it will sit in nicely but we are looking rather good now and hopefully before not to long both sections will be bonded together and I can get to finishing this off at last.
more again very soon
cheers
P
-
unstable load
- Top Dog
- Posts: 1278
- Joined: Mon May 04, 2009 6:53 am
Good evening all
Been at it again and IF I am lucky I might have the two sections bonded together in the very near future
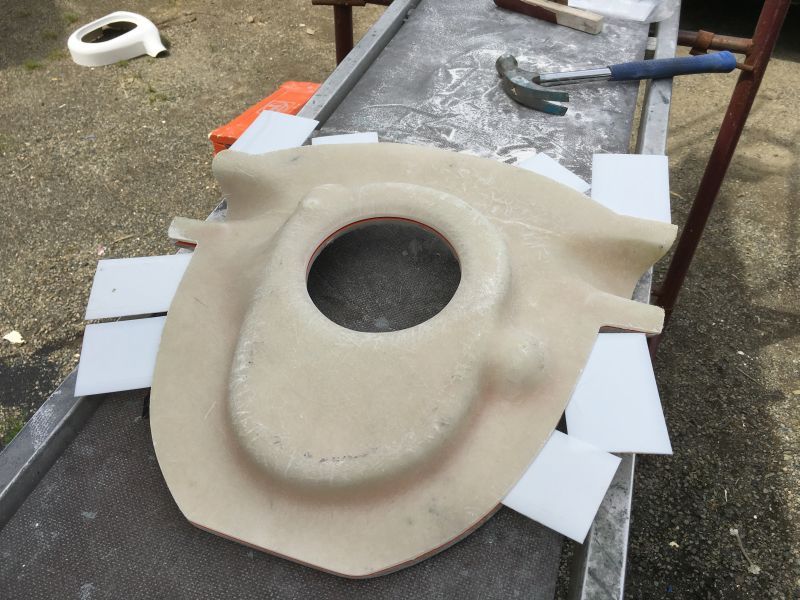
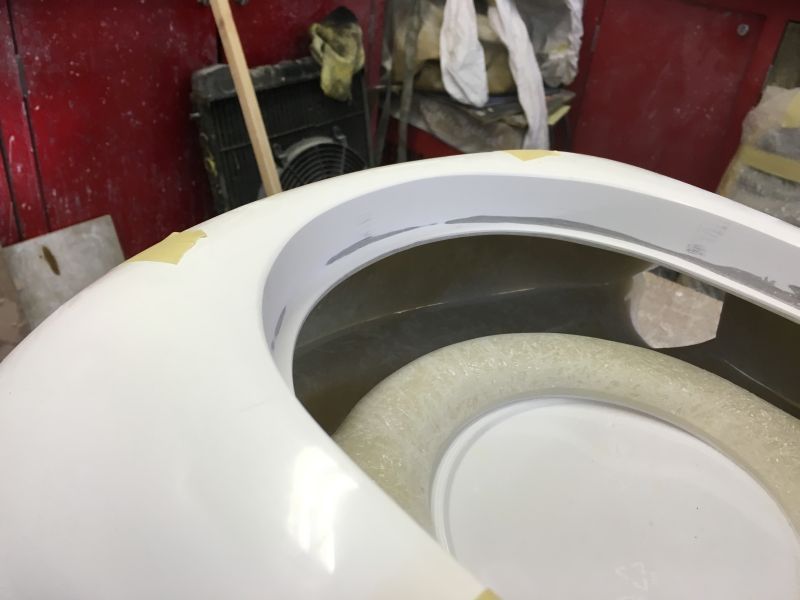
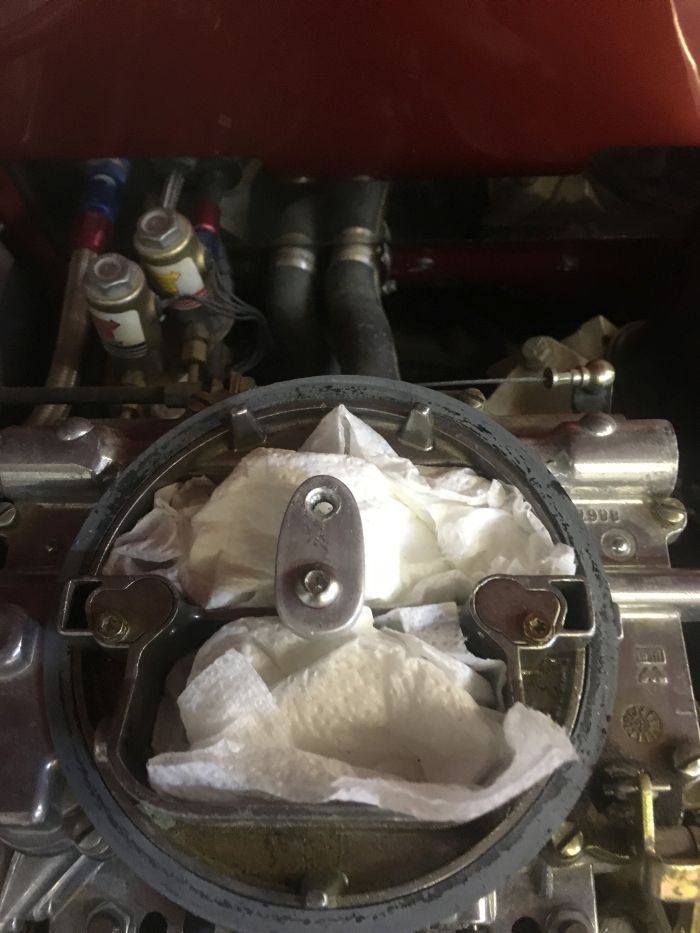
After sanding back the rebate in the top of the mould and making sure that the filter sits in nicely I drew a line around the rebate base and trimmed that back to make neat flange for the filter to sit on.
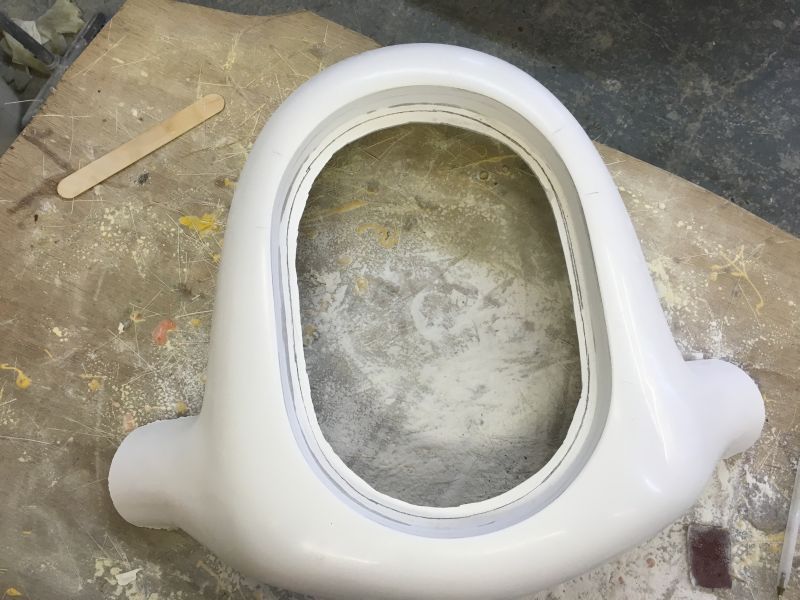
Once that was done it was just a case of sanding back a few very small shards of laminate that were sticking up from the base section and smoothing out around the carb throat area.

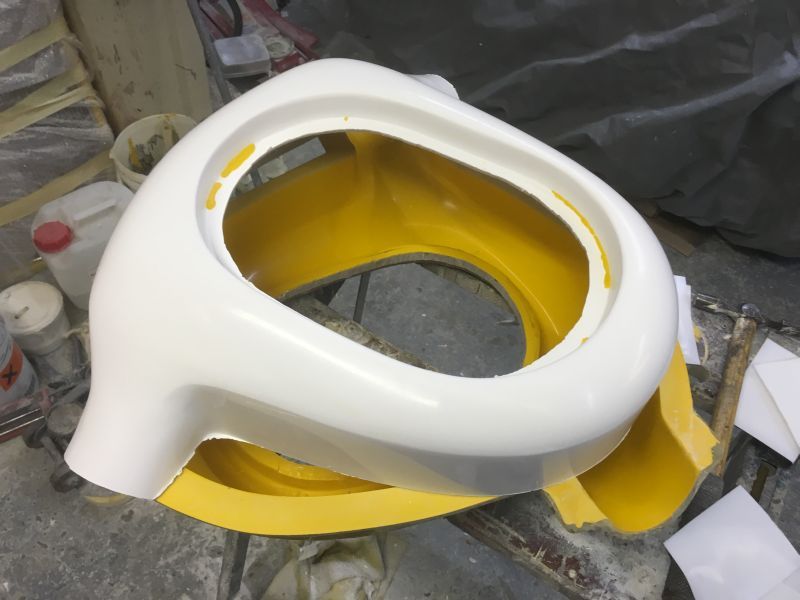
Next it was time to sit the two halves together and see what it looked like.
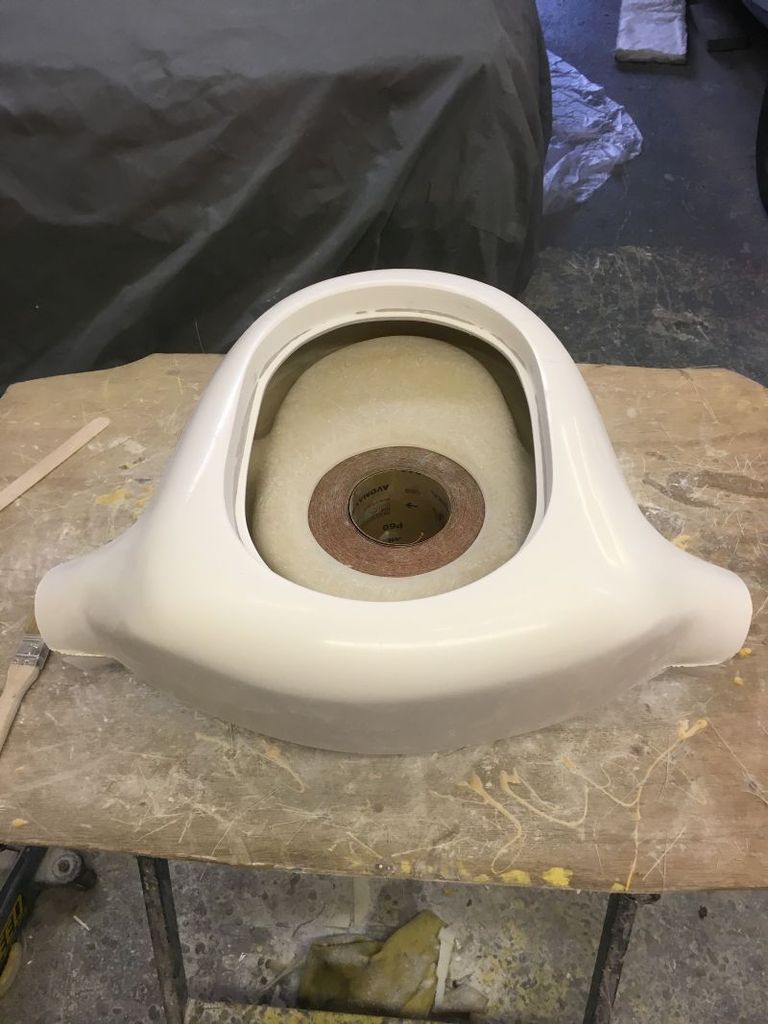
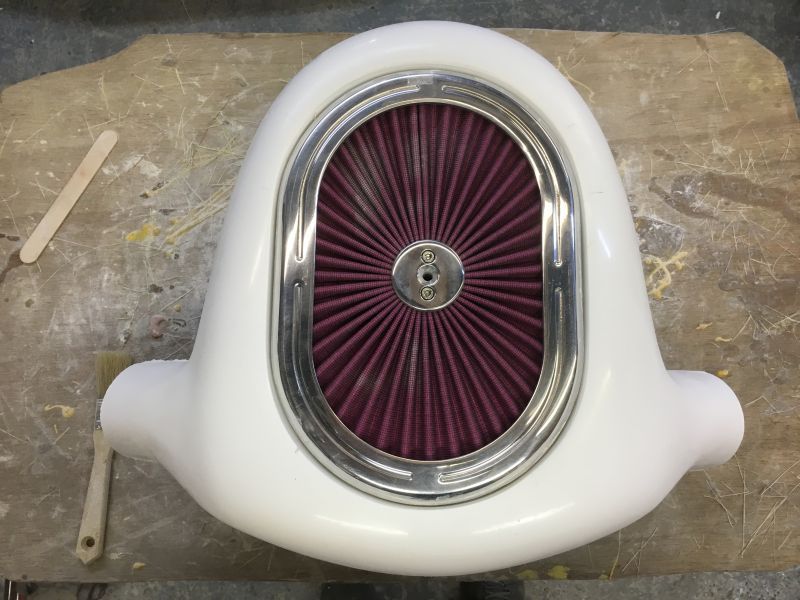
And my final task for last night was to pop the unmasked filter into the top and put a little smile on my face.
The filter has been hidden under tape for so long now I had almost forgotten what it looked like!
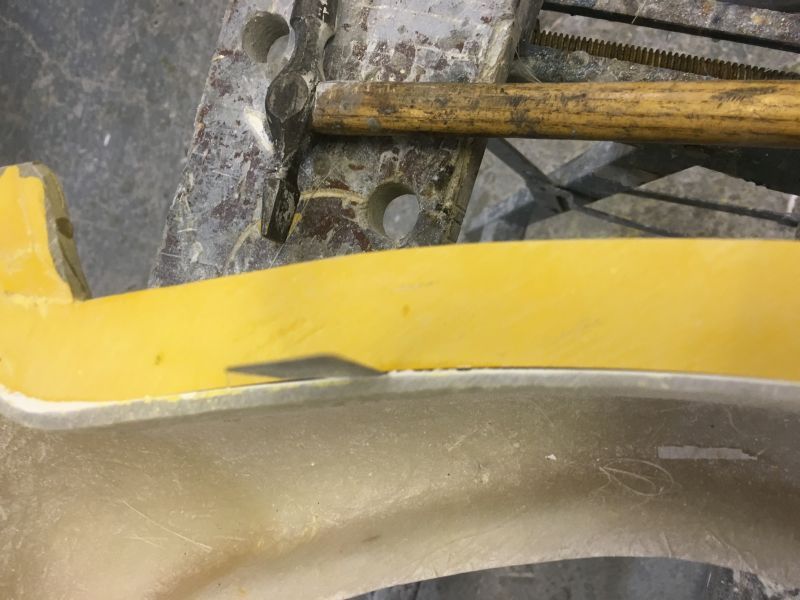
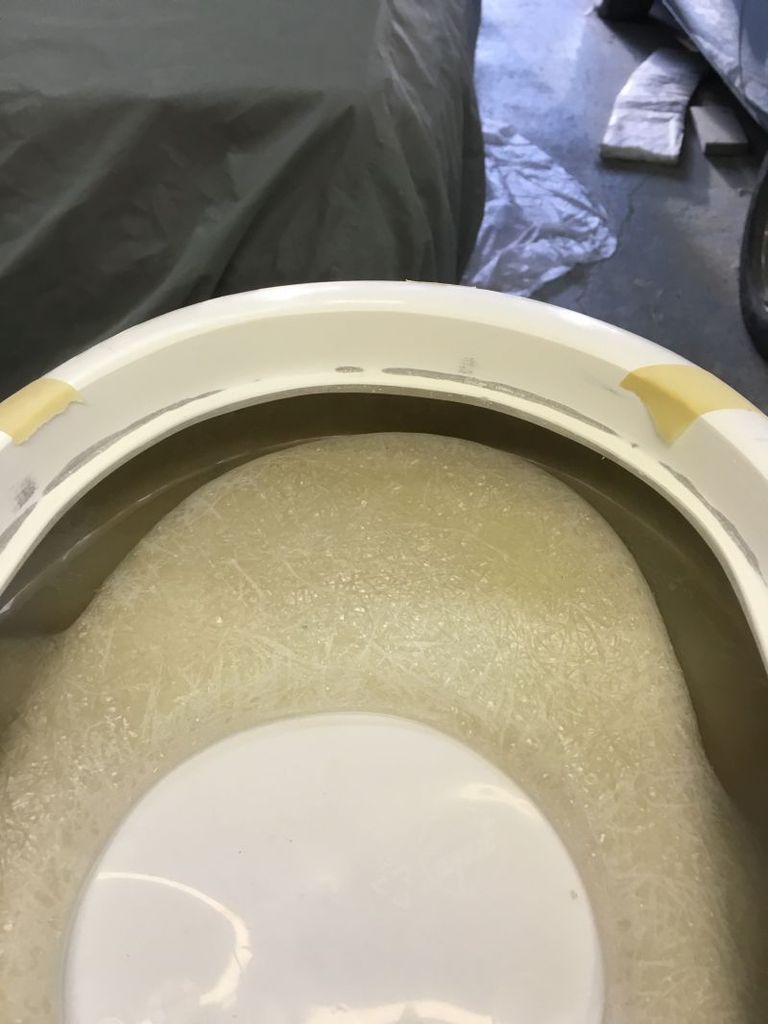
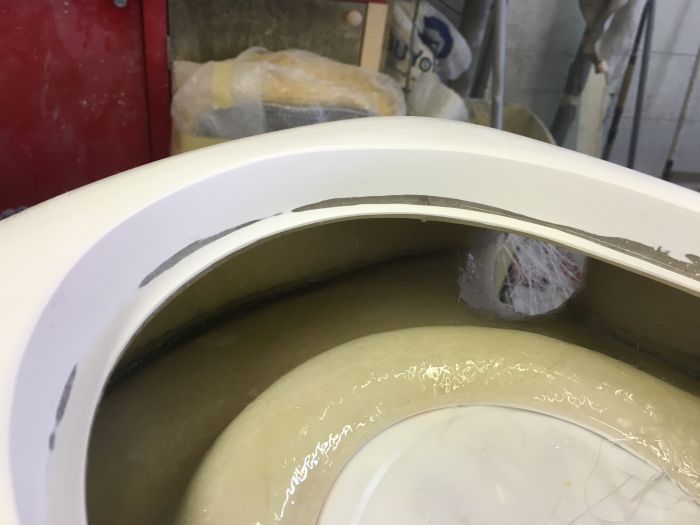
In answer to Johns question about the small bits of yellow gel it was not a case of not enough wax or polishing up but more a case of shrinkage and small areas where the glass did not fully adhere.
The suction forces upon release are considerable and to that end when a mould is released if you have not got the laminates tight into corners like this then small amounts of damage are inevitable even though you try hard to get everything as good as possible.
If the laminates have even a small void between them this is what happens but it is not big deal to sort out repairs to the mould.
Hope this answers your question John
More again soon
cheers
P
Been at it again and IF I am lucky I might have the two sections bonded together in the very near future
After sanding back the rebate in the top of the mould and making sure that the filter sits in nicely I drew a line around the rebate base and trimmed that back to make neat flange for the filter to sit on.

Once that was done it was just a case of sanding back a few very small shards of laminate that were sticking up from the base section and smoothing out around the carb throat area.

Next it was time to sit the two halves together and see what it looked like.

And my final task for last night was to pop the unmasked filter into the top and put a little smile on my face.
The filter has been hidden under tape for so long now I had almost forgotten what it looked like!

In answer to Johns question about the small bits of yellow gel it was not a case of not enough wax or polishing up but more a case of shrinkage and small areas where the glass did not fully adhere.
The suction forces upon release are considerable and to that end when a mould is released if you have not got the laminates tight into corners like this then small amounts of damage are inevitable even though you try hard to get everything as good as possible.
If the laminates have even a small void between them this is what happens but it is not big deal to sort out repairs to the mould.
Hope this answers your question John
More again soon
cheers
P
Good grief
A double dose in one evening
After making sure that I was happy with the fit of both sections for the last time I masking taped the two bits together to hold them when I applied the boding agent.
I have used a different material this time as opposed to the Crestomer shown before as it is a structural bonder and can withstand considerable heat.
It also does not shrink very much and finally goes off very quickly which is a bonus in this instance.
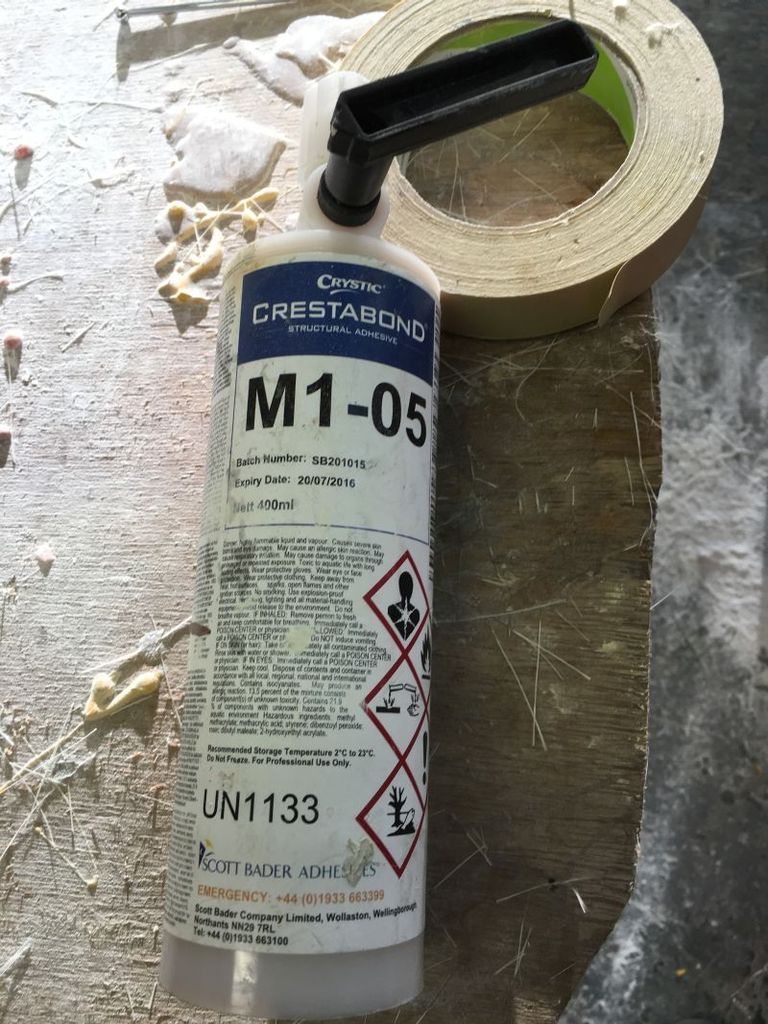
A special nozzle is attached to the tube and then as its squirted out it mixes together the two parts within the tube itself very similar to some builders sealants and m sure many other forms of glue.
A good bead was applied all the way around and then I bent the shaft of a coving ball and made a neat joint around the internal perimeter.

That's it ,no going back now and finally after a very long time I have my filter housing as one peice.
This will be allowed to cure now for a day or so and then I will run a small CSM tape around the internal joint and then its onto final finishing of the outside.
Cheers
P
A double dose in one evening
After making sure that I was happy with the fit of both sections for the last time I masking taped the two bits together to hold them when I applied the boding agent.


I have used a different material this time as opposed to the Crestomer shown before as it is a structural bonder and can withstand considerable heat.
It also does not shrink very much and finally goes off very quickly which is a bonus in this instance.

A special nozzle is attached to the tube and then as its squirted out it mixes together the two parts within the tube itself very similar to some builders sealants and m sure many other forms of glue.
A good bead was applied all the way around and then I bent the shaft of a coving ball and made a neat joint around the internal perimeter.


That's it ,no going back now and finally after a very long time I have my filter housing as one peice.
This will be allowed to cure now for a day or so and then I will run a small CSM tape around the internal joint and then its onto final finishing of the outside.
Cheers
P
-
unstable load
- Top Dog
- Posts: 1278
- Joined: Mon May 04, 2009 6:53 am
Hi all
Not had much time this week but hve managed a little more on the housing.
The Crestabond fully cured over a couple of days so it was time to glass the two sections together in a belts and braces mode.
Only one layer of laminate has been applied but it does tie the two halves together totally.
It was really tricky to get in there and rollering out was impossible so I just used a 1"brush and stippled the crap out of it .
This is how it looks now.
Maybe I will get a bit more time on this again soon as I would very much like to finish off the housing and get on with the little brackets that hold the cone filters in place and have it all done and fitted in time for a show down in Cornwall two weeks tomorrow
Cheers for now
P
Not had much time this week but hve managed a little more on the housing.
The Crestabond fully cured over a couple of days so it was time to glass the two sections together in a belts and braces mode.
Only one layer of laminate has been applied but it does tie the two halves together totally.
It was really tricky to get in there and rollering out was impossible so I just used a 1"brush and stippled the crap out of it .
This is how it looks now.


Maybe I will get a bit more time on this again soon as I would very much like to finish off the housing and get on with the little brackets that hold the cone filters in place and have it all done and fitted in time for a show down in Cornwall two weeks tomorrow
Cheers for now
P
Hello again all
With the show looming I did my absolute best to get the filter housing sorted and fitted to the carb.
After getting the glassing done it was a case of sanding back and doing a little more profile work to get things looking good.
Following that it was out with the acid etch primer and give it a few coats but this proved to be a challenge in itself as the nozzle of the brand new can was either blocked or did not have a full hole from manufacture and all it did when pressed was pour paint down the side of the can and make a hell of a mess so it was out with the ordinary primer and hope for the best.
Came out alright in the end.
With that done out with the satin black and give that a good blast as well.
Following that I had to decide where to put the rocker cover breather so after determining that I drilled a hole and then used a carb fuel inlet fitting as my hose connector.
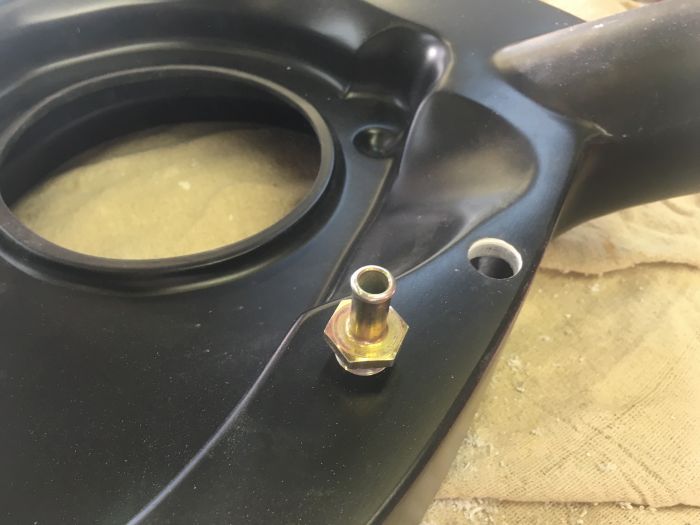
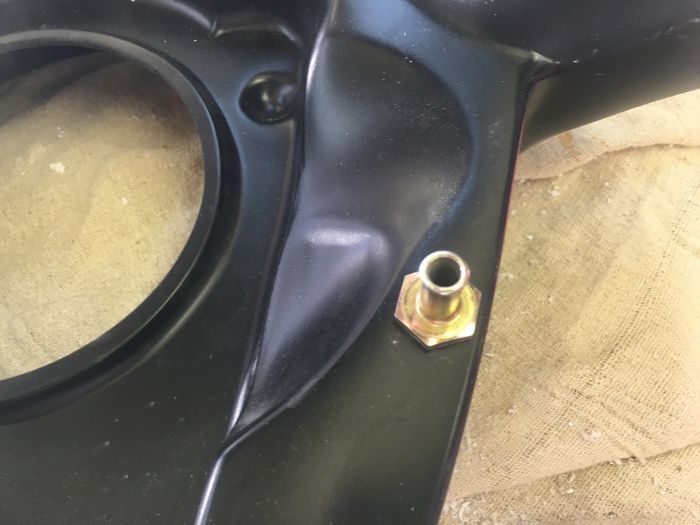
I had previously made a small filter screw extension piece as the filter would sit a bit further back than the original one on the car and this was fitted.
With that all done I then profiled and painted the cone filter brackets and mounted those to the rad and then plumbed the whole thing together and this is how it turned out.
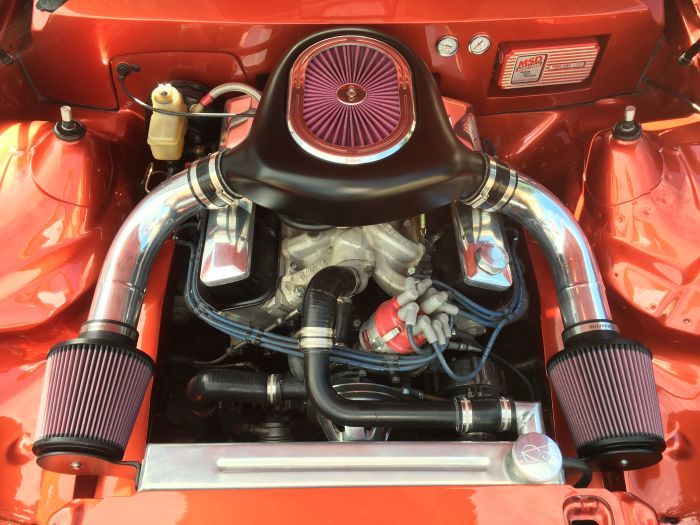
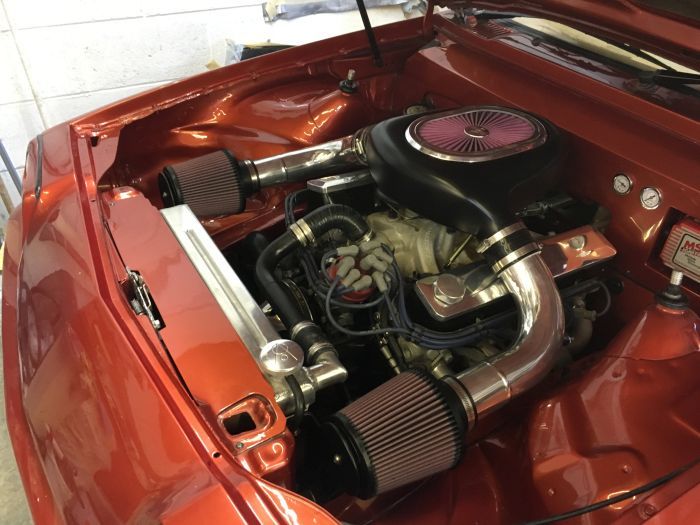
In all honesty I did have a slight clearance issue which was rectified by doing an 8 mm section job but it was done quickly and gave me all the clearance I needed so no dramas there.
Did I get it done in time for the show?
Well yes is the answer to that and does it work?
A big fat yes to that as well as the engine was instantly better on pick up not that it was a slouch anyway and just feels much much better throughout the entire rev range.
Thanks to all that have followed along with my project and thank you once again for all of the kind comments and questions which I have tried to answer as best as I could.
THE END
cheers
P
PS Bored now
With the show looming I did my absolute best to get the filter housing sorted and fitted to the carb.
After getting the glassing done it was a case of sanding back and doing a little more profile work to get things looking good.
Following that it was out with the acid etch primer and give it a few coats but this proved to be a challenge in itself as the nozzle of the brand new can was either blocked or did not have a full hole from manufacture and all it did when pressed was pour paint down the side of the can and make a hell of a mess so it was out with the ordinary primer and hope for the best.
Came out alright in the end.


With that done out with the satin black and give that a good blast as well.
Following that I had to decide where to put the rocker cover breather so after determining that I drilled a hole and then used a carb fuel inlet fitting as my hose connector.


I had previously made a small filter screw extension piece as the filter would sit a bit further back than the original one on the car and this was fitted.

With that all done I then profiled and painted the cone filter brackets and mounted those to the rad and then plumbed the whole thing together and this is how it turned out.


In all honesty I did have a slight clearance issue which was rectified by doing an 8 mm section job but it was done quickly and gave me all the clearance I needed so no dramas there.
Did I get it done in time for the show?
Well yes is the answer to that and does it work?
A big fat yes to that as well as the engine was instantly better on pick up not that it was a slouch anyway and just feels much much better throughout the entire rev range.
Thanks to all that have followed along with my project and thank you once again for all of the kind comments and questions which I have tried to answer as best as I could.
THE END
cheers
P
PS Bored now