How would you do it?
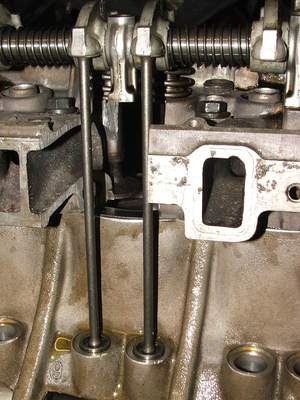
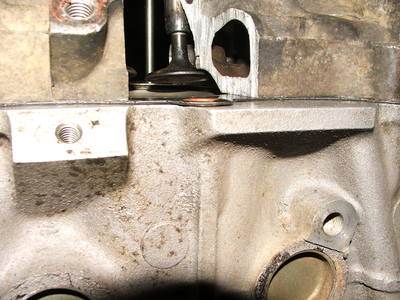
My RV8 just had the heads refurbed. I lost 12 thou off the worst one but now they are matched with 28.5cc chambers. Anyhoo i want to check the piston to valve clearance as i was close before the recent work.
So its a top hatted 4.6 and i have a Typhoon cam with hydraulic lifters. Head gaskets are 50 thou MLS to replace the old Elring composites. The pistons are 4.0 shallow bowl with no cutouts. Hence my concern.
How to check piston to valve clearance?
Moderator: phpBB2 - Administrators
Do i install rocker pedestal shims in order to achieve zero pre-load from the lifter while off cam?
As i do not have any solid lifters to hand i have made up a pair of weak valve springs from wire. These are strong enough to return the valve but hopefully wont push into the hydraulic lifter.
Or should i bodge 2 old hydraulic liftes to make test solids?
As i do not have any solid lifters to hand i have made up a pair of weak valve springs from wire. These are strong enough to return the valve but hopefully wont push into the hydraulic lifter.
Or should i bodge 2 old hydraulic liftes to make test solids?
10.612 @ 129.77
176.5 standing mile.
176.5 standing mile.
Hi
dry assemble the bottom end without rings, put checker springs in place of the valve springs in cylinder no 1 (rover rocker shaft springs will do) and using an old head gasket put the head on. Set piston to 25 before TDC and with a dial gauge on inlet valve 1 open the valve until it hits the piston top plot the lift to contact on a piece of graph paper, advance the crank 2 degrees do the same again until 25 after TDC, now do the same for the exhaust valve on the same graph plot valve lift for the cam you have (dial gauge on a tappet you take the points one degree apart as t he cam turns half the engine rate) the gap on the plots is the clearance. This method is more time consuming than plasterseen but you only have to do it once for the engine and if you change cams you only have to plot a new lift curve onto the graph to see if you have clearance.
best regards
Mike
poppet valves rule!
There are loads of different ways of doing this, I don't really like the plasticine method all that much because it is hard to measure the clearance and you only get one shot at doing it each time you dry assemble the motor.
I use adjustable pushrods in the engines that I build, these make doing the check a lot easier, you can buy pushrods just for doing the test or you could try the method below. You also need two cam followers that you have de-oiled, take them apart and fill them with glue or candle wax so that they are solid. You need weaker checker springs, you can use the springs off an old rocker shaft, cut them in half to make two checker springs.
Dry assemble the bottom end, fit a degree wheel on the crank and set up a pointer so it reads zero at TDC. Fit the head with a gasket, fit the two cam followers, with the followers on their base circle I'd then use the adjustable pushrods so that there is no free play in the system BUT make sure that the valves have not lifted of their seats. If you are using stock pushrods you will have to shim up the rocker pedestals with something so that there is no free play BUT the valves must not be off their seats. (shimming the rocker shafts won't effect the total valve lift at all so it is OK to do this during the test) This could take some time to setup. (You will only have shim up the pedestals either side of the valves that you are checking, there should only be two pushrods in the engine during the test).
Crank the engine to 25 degrees BTDC on the end of the exhaust stroke. The exhaust valve will be starting close, it will be well on its way to being closed. Now push the valve down by hand, you can push on the top of the rocker. If the valve moves along way, like 5mm or more then you don't need to worry about it at least at the current crank angle. Do the same on the inlet valve. If that;s OK crank the engine aound 5 degrees to 20 BTDC then repeat the test. Keep cranking the engine 5 degrees and testing the valves. During one of the tests you will find that a valve does hit the piston when it is pushed down. Now here is the clever bit, push the valve down and hold it down using the valve spring retainer, pull the rocker away from the valve stem then by using feeler gauges measure the gap between the end of the valve stem and the rocker pad. If you can fit 3mm of gauges in the gap then the clearance was 3mm! REMOVE the feeler gauges, crank the engine another 5 degrees and repeat the test, at some point you will find the crank angle which has the least valve to piston clearance, this is your critical angle and clearance, it might be 10 degrees BTDC, it might be 10 degrees ATDC. It might differ for each valve. You need at least 2.5mm minimum on the exhaust valve, and 1.5mm on the inlet. If you really want to test build your engine properly you should do all the cylinders/valves.
As you are using a Typhoon cam you should also be checking that you have enough valve spring retainer to valve stem oil seal clearance, you can crank the engine until you are at peak valve lift for each valve then push the valve down until the retainer hits the seal, hold the valve in this position then measure the gap between the rocker pad and the tip of the valve, this is the clearance. From memory the Typhoon may require you to machine the valve guides, I don't know how much clearance you need but I would have thought that 1mm would be the minimum.
I think that you are going to have piston the valve clearance issues, I'd be very careful when doing the test, if the engine locks up as you turn the crank don't force it! I also think that your CR is going to be too high but I've already said that in another post!
All of the above leads to another can of worms which is total valve lift once the engine has been over revved and the valves have floated, then there is the subject of valve train geometry which is poor in these engines, fitting shims under the rocker shaft pedestals makes this worse which is why I use adjustable pushrods.
Edit...If you don't want to torque the head down using your new gaskets you could get some 50 thou ali and lay is across the top of the block either side of the cylinder that you are working on, you only need to use 4 head bolts too!

Thanks guys, thats cleared up a few thoughts i had.
Just to add... this Typhoon cam has ran along with the 4.0 pistons in my engine without issue for 2 years.
Its only now after the last head skim i decided to check the clearance. Maybe i was lucky or maybe i just had enough clearance previously.
I am looking forward to doing a few tests this weekend and will report my findings.
10.612 @ 129.77
176.5 standing mile.
176.5 standing mile.
Mike!! You have too much patients and time;-)
Guys - I pondered for ages about this and have now learned a new method that takes 20 seconds!!
Stick a bore scope in the spark plug hole and watch the clearence! (80quid - but really useful)
Most people may be able /can eye up a mm - use the angles of the valve head to calibrate your eyes
A mate showed me this trick - has never failed apparently. Save the dial gauge for when it gets really tight (you can see no gap at all)
Spent so much on trial and error!
I ran a Typhoon cam in my engine and did have to cut pockets to the pistons. The block has been machined to get the pistons close to the deck, I used steel gaskets and the heads were 4,6 heads. The valves barely touched the pistons.
But every engine is unique, hard to know the history unless you start with brand new components. Safer to check. Endoscope is a nice piece of equipment and worth its price.

But every engine is unique, hard to know the history unless you start with brand new components. Safer to check. Endoscope is a nice piece of equipment and worth its price.