Page 1 of 4
First time rebuild - big picture heavy.
Posted: Tue Jul 21, 2015 6:35 pm
by AntC
I have a V8 in my series 1 Land Rover and, as part of the rebuild I have today just stripped the engine.
It was previously running with a very low oil pressure - at tickover 10psi cold and barely anything hot and with some revs, 20psi cold and 10 to 12 hot. The only engines I have rebuilt before really need stuff changing, but this one doesn't seem too bad.
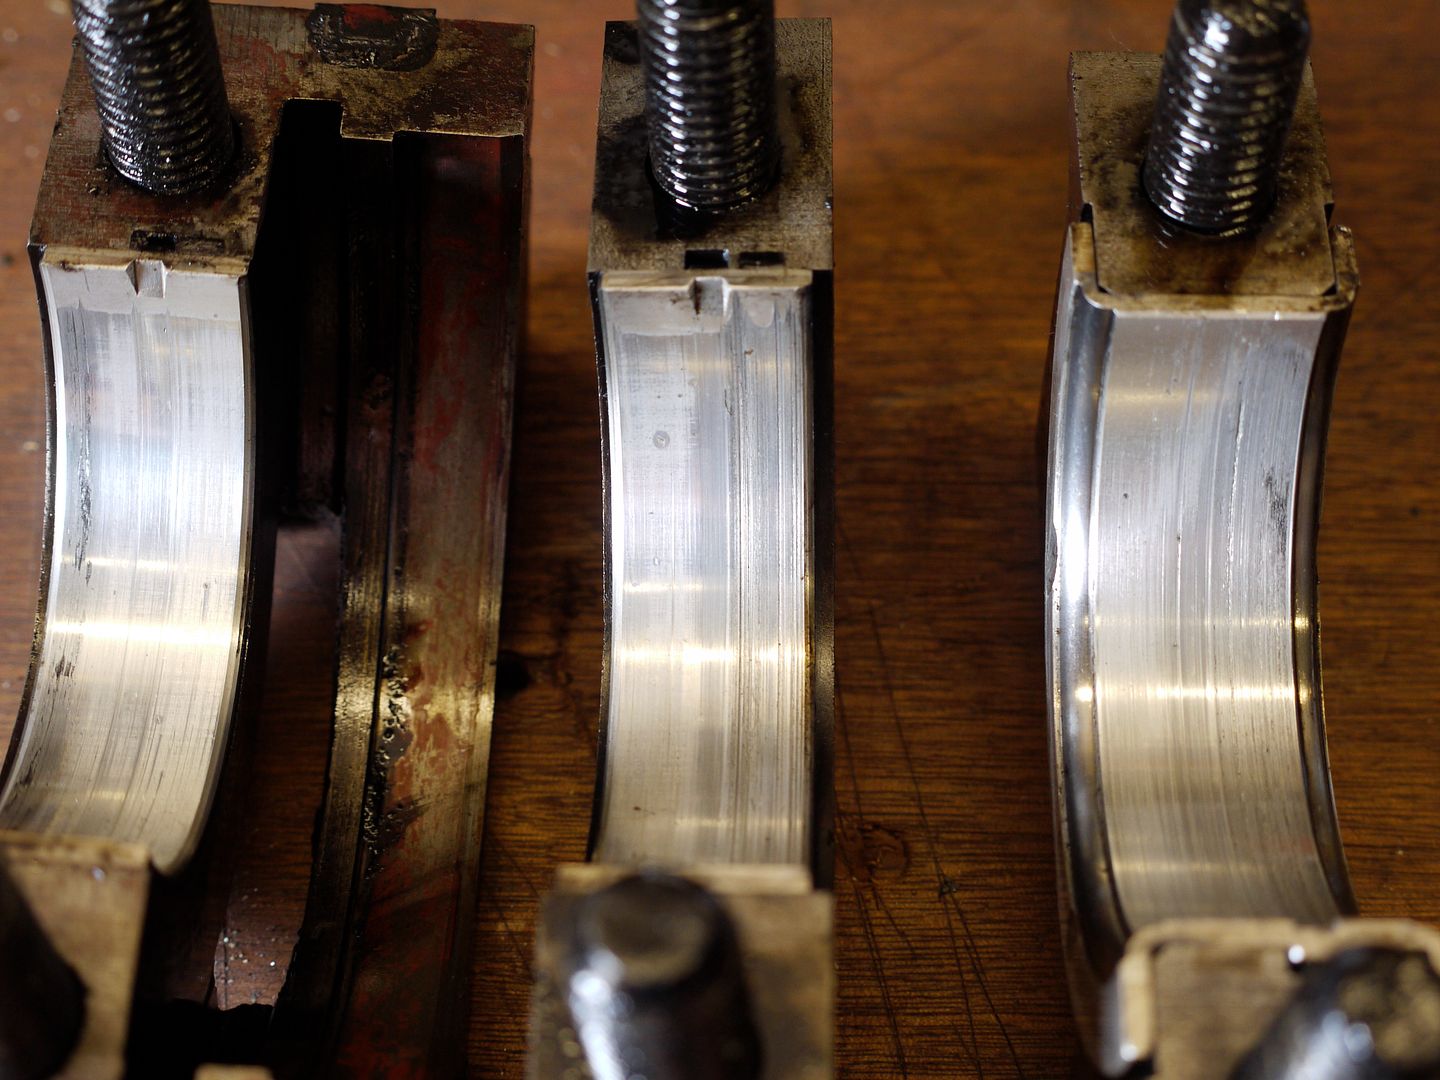
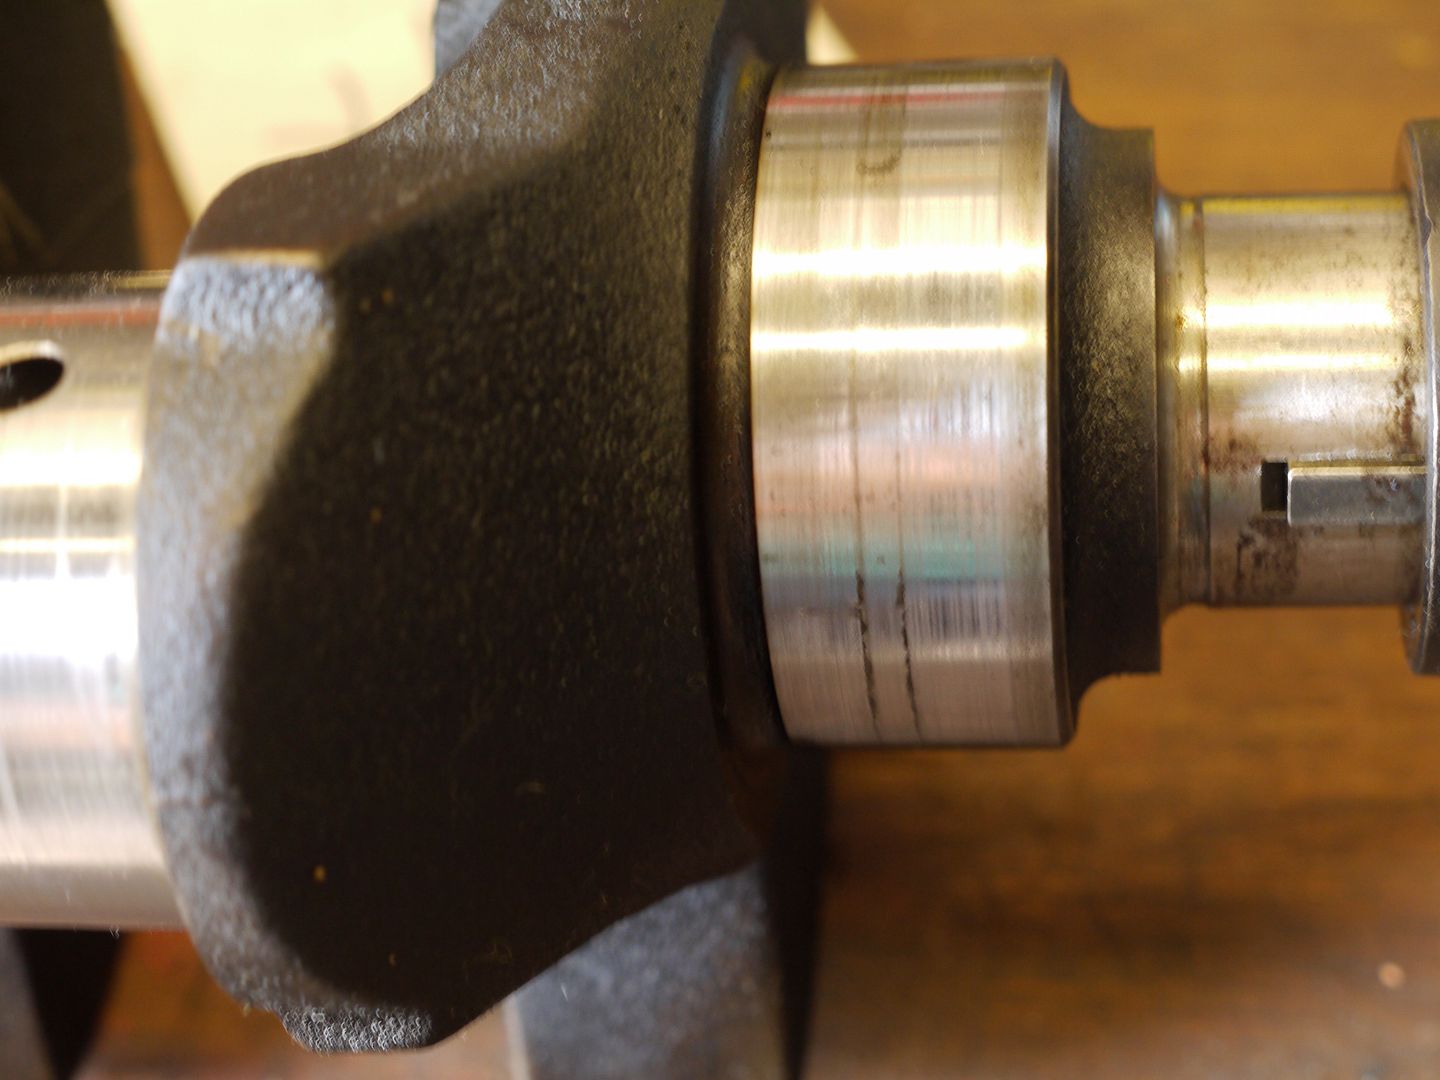
Big end shells
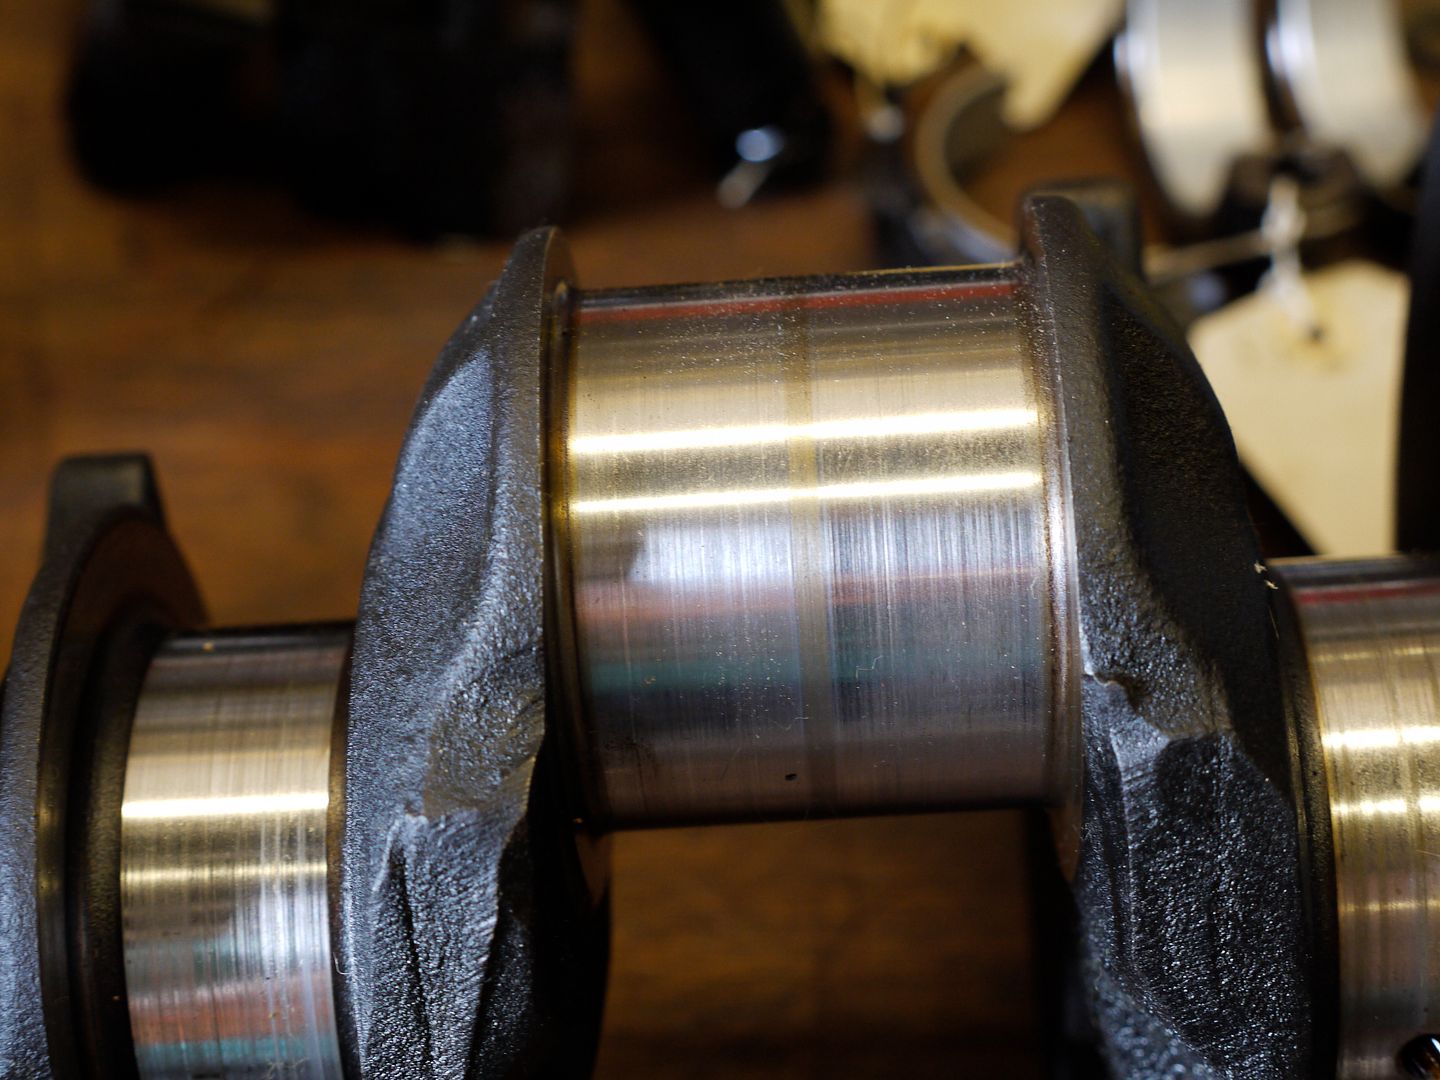
Crankshaft
[/img]
http://i826.photobucket.com/albums/zz18 ... 020226.jpg[/img]
The big ends and main bearing shells are all standard.
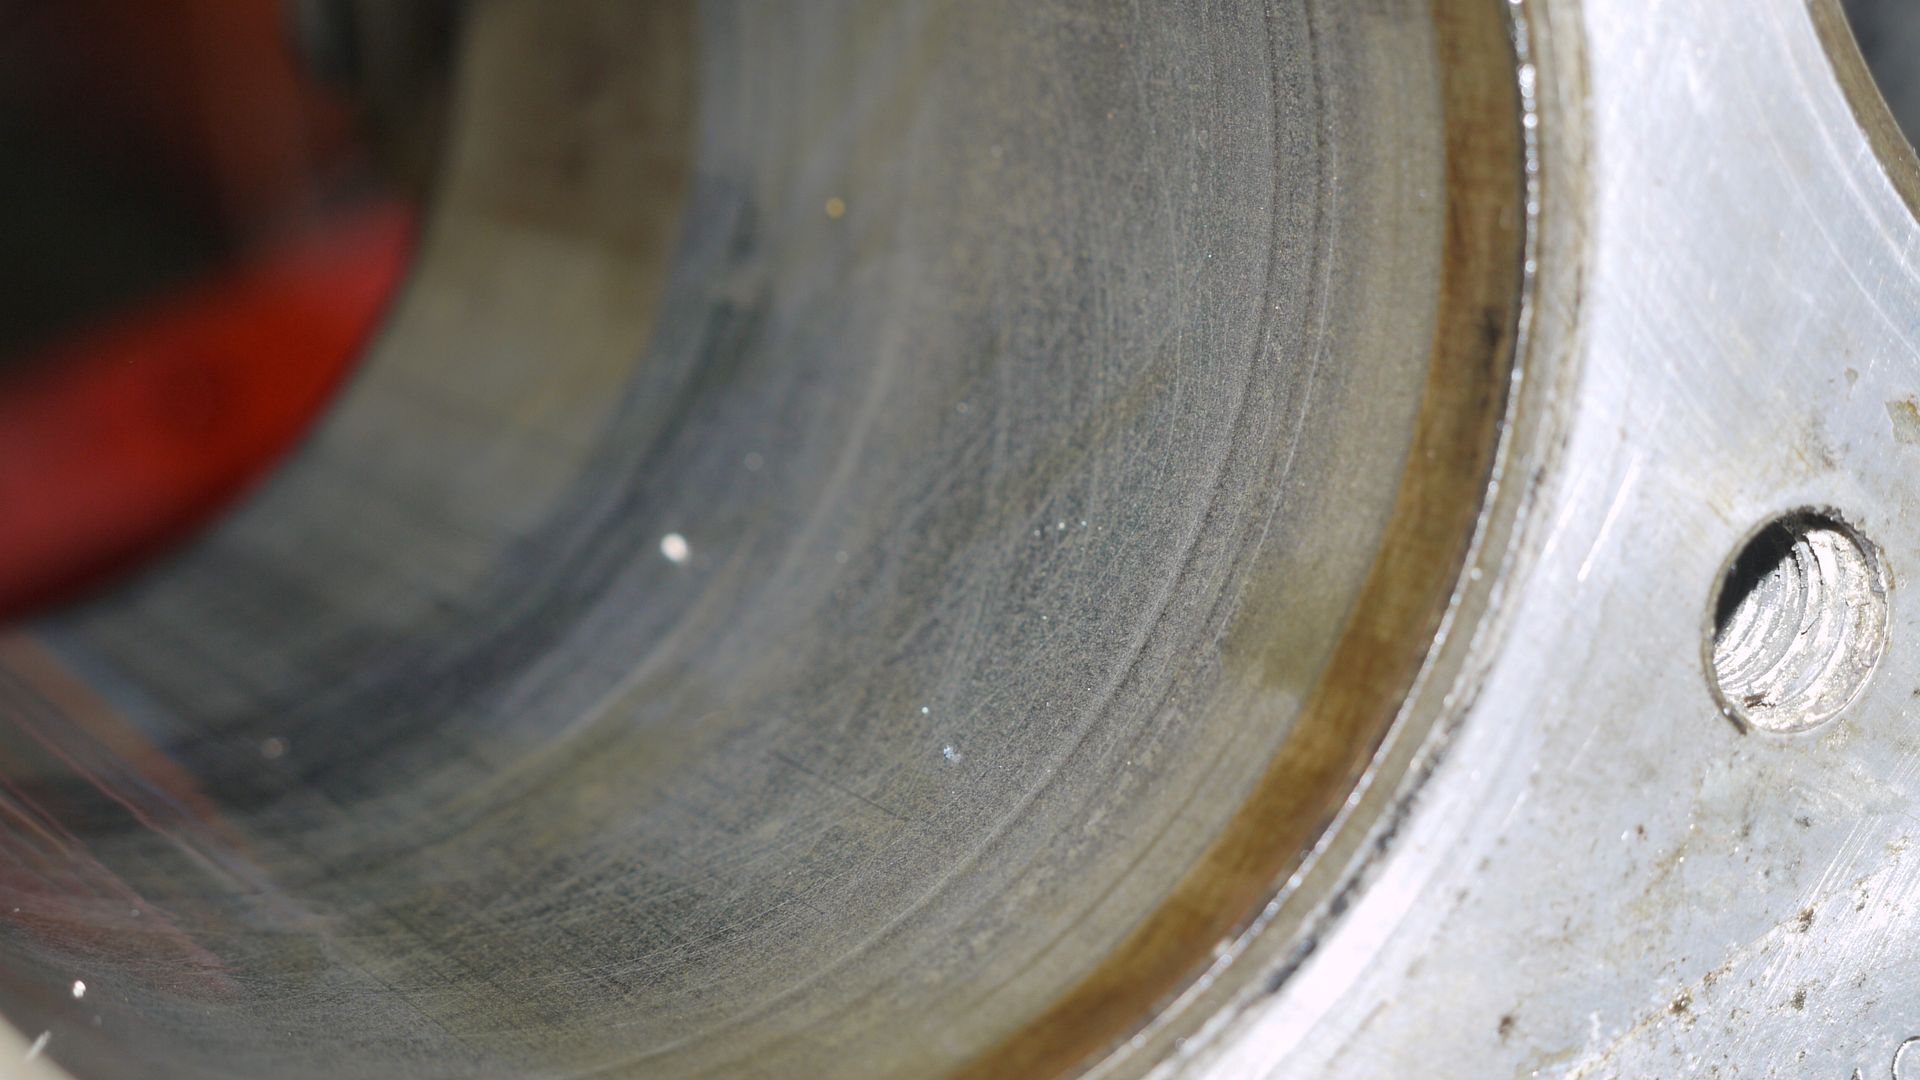
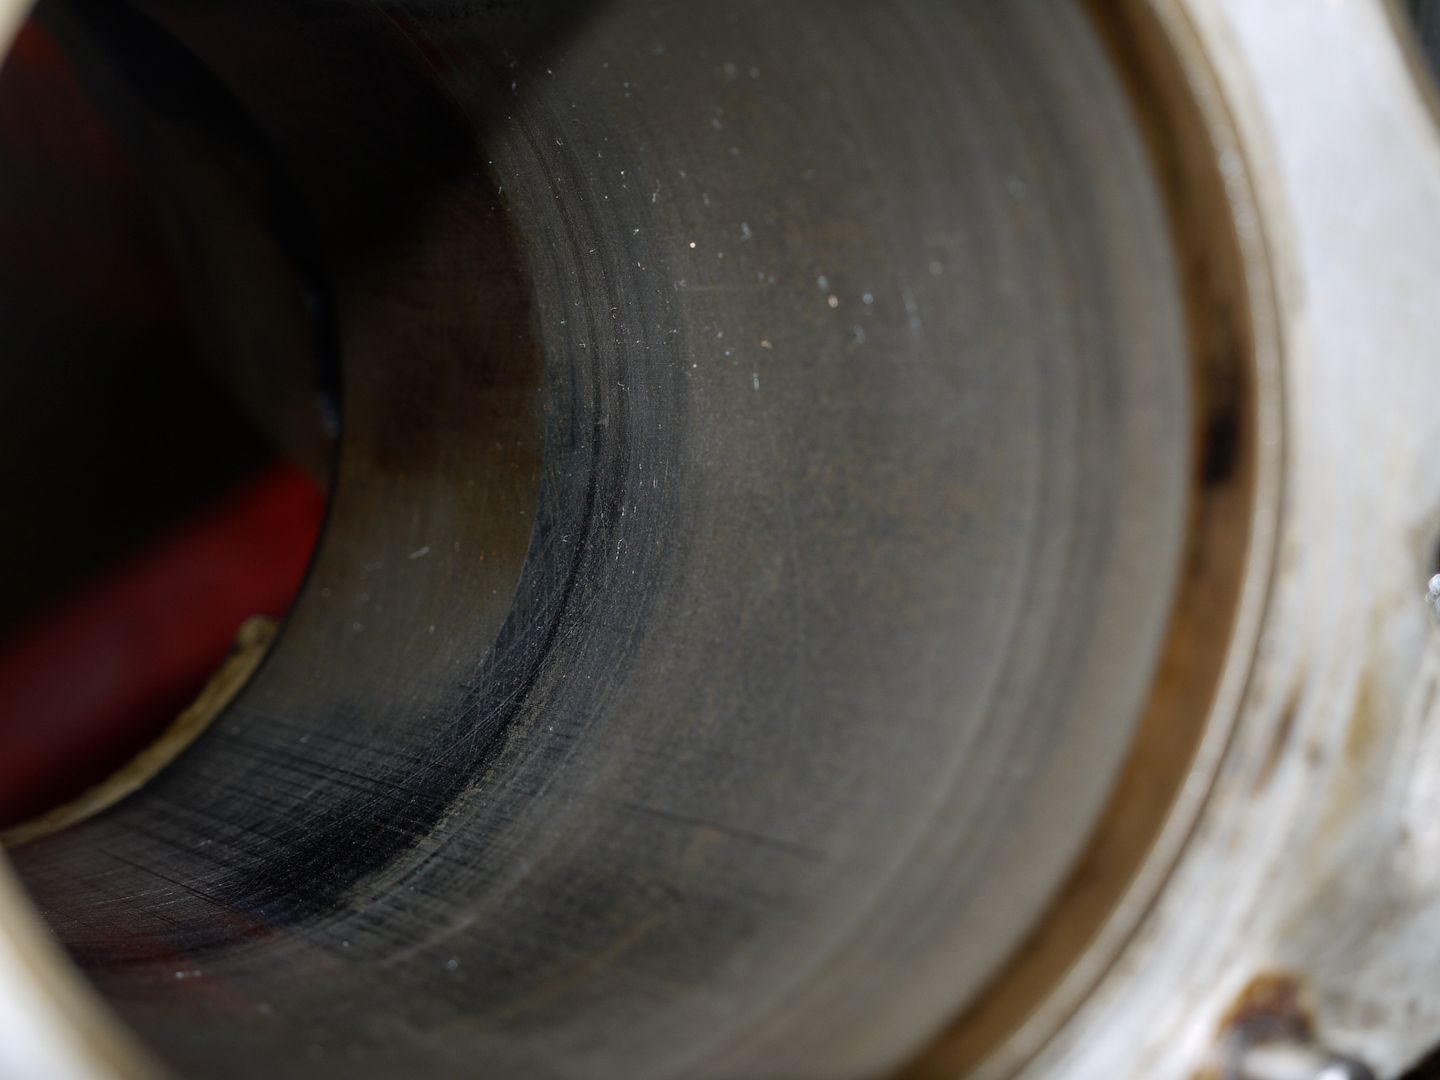
The bores
[/img]
http://i826.photobucket.com/albums/zz18 ... 020229.jpg[/img]
Seemed very smooth when I cleaned the up with a rag and I only noticed the marks that the rings have made when I saw the photos. There is no lip at the top of the bore.
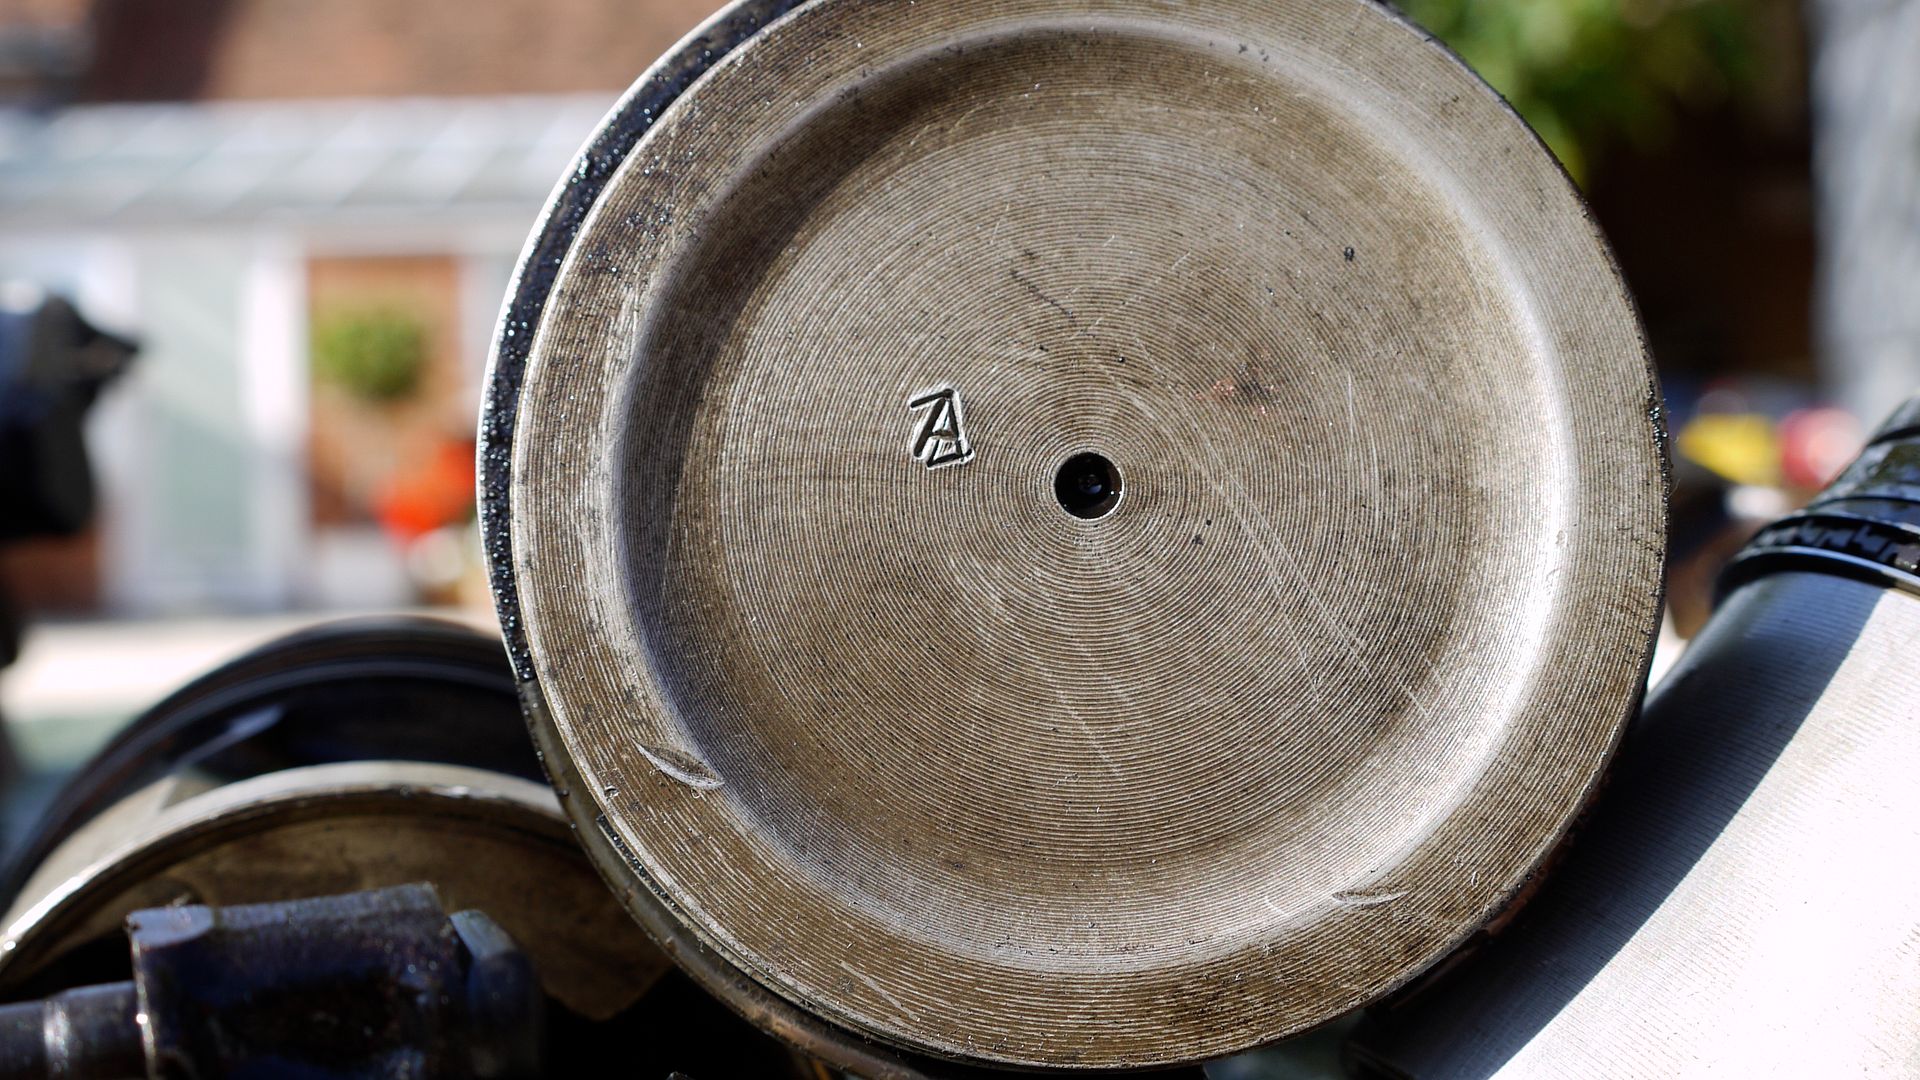
The pistons
- http://i826.photobucket.com/albums/zz18 ... 020239.jpg[/img]
have an A stamped on some of them and
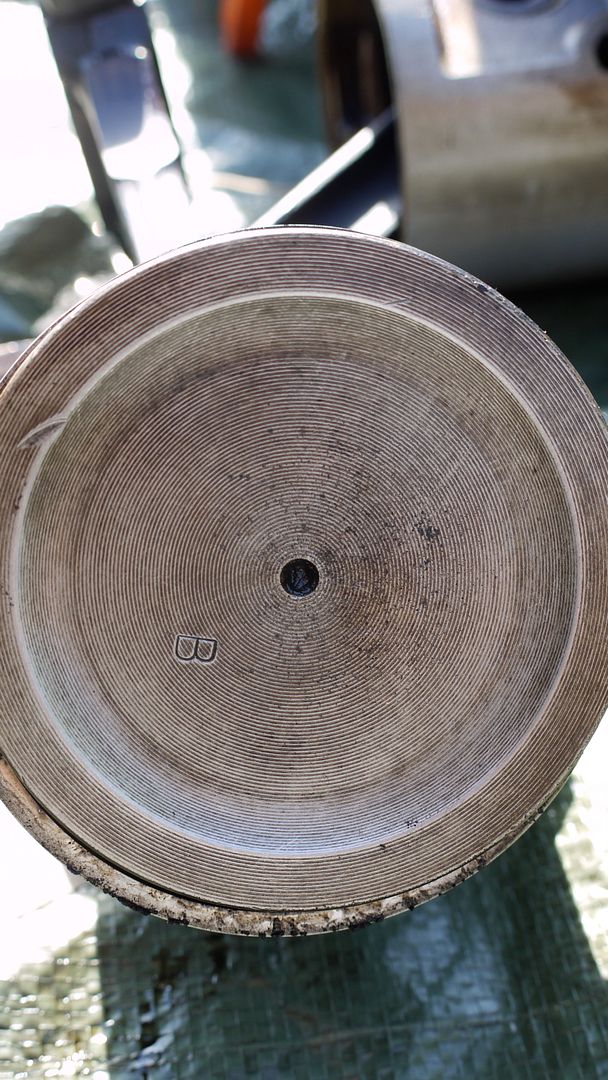
a B stamped on others. Again, in the absence of any indication to the contrary, I take it that these are standard. What is the significance of the A and B stamps which are mirrored with the same letters stamped onto the crankcase adjacent to each piston?
[/img]http://i826.photobucket.com/albums/zz18 ... 020237.jpg[/img]
In my ignorance they look quite good.
I'm on a limited budget but think I need to get the crank reground with new shells etc. Do you think I could get away with just putting new rings into the pistons. The engine used no oil, neither did it smoke at all.
Is Rimmer Bros the best source for parts?
Posted: Tue Jul 21, 2015 6:50 pm
by bigaldart
Hi,
The A and B denote fractionally different sizes or grades of piston, the piston and bore fits were selected at the factory to give ideal clearances. On reusing the pistons the crucial areas are the side clearance of the rings in the grooves and the skirt clearance in the bore. The workshop manual should have the acceptable dimensions. You will certainly need a new cam and lifters as well.
Alan
Posted: Tue Jul 21, 2015 7:28 pm
by AntC
bigaldart wrote:Hi,
The A and B denote fractionally different sizes or grades of piston, the piston and bore fits were selected at the factory to give ideal clearances. On reusing the pistons the crucial areas are the side clearance of the rings in the grooves and the skirt clearance in the bore. The workshop manual should have the acceptable dimensions. You will certainly need a new cam and lifters as well.
Alan
Hi Alan
So, are you saying that the pistons could be reused subject to getting the correct size of rings? I know it's hard to tell from photos, but I would like to reuse them.
Yes, a new camshaft and lifters is on the list together with head bolts, main bearing bolts and big end bolts and nuts.
The oil pump looks newish and might have been fitted by the PO to try and gain a bit of oil pressure so I am a bit undecided about that. One good thing with this engine is that changing the oil pump isn't that big a job once its all back together - or so it seems to my untrained eye!
Posted: Tue Jul 21, 2015 7:59 pm
by ChrisJC
Almost certainly OK to reuse pistons. But new rings a must. And perhaps a quick hone on the bores.
I use Rimmer Bros for most of my parts. You can make the call whether you want OEM or various other quality grades, which I quite like.
Chris.
Posted: Tue Jul 21, 2015 9:00 pm
by kiwicar

with regard the pistons, and glaze bust the bores at the minimum a proper hone if you can get it done for a reasonable price, the shells look good but the low oil pressure would make me think a regrind and set of shells would be well worth the money. New cam would be essential. pull the gallery plugs and give the oil galleries a really good brush out the cam lobes have to have gone somewhere

. I would renew the oil pump internals and check all the clearances, radius the ports but otherwise leave it stock, don't fit a high pressure spring they just kill your distributor gear.
best regards
Mike
Posted: Tue Jul 21, 2015 9:59 pm
by r2d2hp
Is that mark on the piston an indication that its been hitting a valve
Posted: Wed Jul 22, 2015 8:30 am
by AntC
kiwicar wrote:
with regard the pistons, and glaze bust the bores at the minimum a proper hone if you can get it done for a reasonable price, the shells look good but the low oil pressure would make me think a regrind and set of shells would be well worth the money. New cam would be essential. pull the gallery plugs and give the oil galleries a really good brush out the cam lobes have to have gone somewhere
. I would renew the oil pump internals and check all the clearances, radius the ports but otherwise leave it stock, don't fit a high pressure spring they just kill your distributor gear.
best regards
Mike
Thanks Mike - lots of good advice there! The camshaft wasn't too bad but I shall replace it anyway and clean out the oilways. What brush should I get for that job?
As the engine is in a S1 Land Rover and the weakest link in the transmission is the gearbox, I am not after more power, just a healthy engine!
Posted: Wed Jul 22, 2015 8:32 am
by SimpleSimon
That crank certainly a needs a grind and those bores definitely need glaze busting before a fresh set of rings are installed, if the pistons check out then re use them

Posted: Wed Jul 22, 2015 8:41 am
by AntC
SimpleSimon wrote:That crank certainly a needs a grind and those bores definitely need glaze busting before a fresh set of rings are installed, if the pistons check out then re use them
Not quite sure what you mean by the pistons checking out.

This is pretty much what they all look like.
Everything is jut as it was pulled from the engine. THe cleaning process starts now.
Posted: Wed Jul 22, 2015 8:42 am
by DaveEFI
Those shells look too good to me to be the cause of low oil pressure, if they are all the same. Are you certain the gauge is accurate? The electric ones often ain't.
Does the low pressure warning light come on when running?
Posted: Wed Jul 22, 2015 9:59 am
by AntC
DaveEFI wrote:Those shells look too good to me to be the cause of low oil pressure, if they are all the same. Are you certain the gauge is accurate? The electric ones often ain't.
Does the low pressure warning light come on when running?
Hi Dave
There was no low oil pressure warning light fitted, or if it was, it wasn't wired up, so my only reference was the gauge. I did change it for another one at one point but it made no difference. The Land Rover had spent many years as a trialler, so many of the standard parts were either ditched or not working consequently rebuilding it is a bit more of a task than it might otherwise be.
The shells are all the same.
[/img]
Posted: Wed Jul 22, 2015 11:43 am
by Eliot
I would replace the shells - they don't look that great to me, plus its in bits anyway - daft not to. If there's no lip on the crank, then I would just give them a clean with fine emery cloth.
Definitely need to de-glaze those bores.
Looks like there's been some crap in the oil - so make sure you thoroughly clean everything including all the gallery's.
Also strip the oil pump down and examine the plunger for wear and/or sticking.
Posted: Wed Jul 22, 2015 12:42 pm
by DaveEFI
AntC wrote:DaveEFI wrote:Those shells look too good to me to be the cause of low oil pressure, if they are all the same. Are you certain the gauge is accurate? The electric ones often ain't.
Does the low pressure warning light come on when running?
Hi Dave
There was no low oil pressure warning light fitted, or if it was, it wasn't wired up, so my only reference was the gauge. I did change it for another one at one point but it made no difference. The Land Rover had spent many years as a trialler, so many of the standard parts were either ditched or not working consequently rebuilding it is a bit more of a task than it might otherwise be.
The shells are all the same.
[/img]
Right. It's bit late now, but would have been interesting to see the oil pressure on a known accurate gauge. Oil pressure switches tend to work properly or be broken. On my SD1 the electric gauge often shows what looks to be zero at idle - but the light doesn't come on.
I'd be inclined to take the crank to an expert. It may just need a polish and new shells. Most of the worn engines I've taken apart have copper showing through the shells. The scoring on the shells may have been dirt on assembly, or a lack of filter and oil changing.
Posted: Wed Jul 22, 2015 12:53 pm
by Eliot
DaveEFI wrote:
I'd be inclined to take the crank to an expert. It may just need a polish and new shells. Most of the worn engines I've taken apart have copper showing through the shells. The scoring on the shells may have been dirt on assembly, or a lack of filter and oil changing.
Agreed.
Posted: Wed Jul 22, 2015 12:53 pm
by AntC
Yes, It is a bit late - the engine has been on a stand and hasn't run since July 2012 followed by a gearbox rebuild and the realisation that much of the chassis had rusted away, which prompted the complete rebuild.
I will be taking the parts to an expert - Thurston Engineering who have done quite a bit for me over the years. Not cheap but really good.
I think there was dirt in the engine at some time and the oil pick-up gauze had quite a lot of crap stuck to the underside and, judging by the state of the block, sump and other parts in contact with the engine oil, I don't think many oil changes.
I am in the middle of taking the pump off the timing case cover which would have been reasonably easy until I found a bolt head completely rounded off by a PO. Don't you just love 'em!
So now it's back to the Jizer, wonderful stuff but it had a bad effect on my silicone gloves!