Page 10 of 17

Posted: Sun Feb 14, 2016 5:42 am
by unstable load
Paul,
Once you get to the point in the 3rd picture, is it possible or ill advised to use compressed air to blow into the gap to help things along?

Posted: Sun Feb 14, 2016 8:58 am
by gelmonkey
Hi John
Compressed air would do nothing to aid in the release as the mould is not a closed mould.All that would happen if I tried to use air on this would be to blow dust around and there is plenty of that in the garage already :lol:

Compressed air is normally used on deep moulds as there is no way of getting right to the bottom of it.
When I say deep moulds I mean 8" plus and the PCL coupling is generally at the bottom of the mould.
The simple but more time consuming way to relase a mould like this would be to have a 2 or 3 section mould but this in turn means final finishing joint lines etc
Almost every motor yacht we work on has deep bins that are air released.
Most of these bins have virtually no taper on them and this is another reason for air release.

The main body of my mould is going to be a bit of a challenge to pop out but with a bit of patience and loads of filler spreaders it will come out as it is not too deep and I will once the glass has been trimmed from the hole in the middle be able to access from both sides which will help as well.

cheers
P

Posted: Sun Feb 14, 2016 9:24 am
by stevieturbo
On my front wing mould I blew air into it to try and aid release.

My mould was only a couple of layers so not super strong and I didnt want to be yanking really hard on it. The compressed air definitely did seem to help.

But I'm also sure it blew the yellow wax everywhere too all over the mould surface which then needed cleaning off.

No doubt with a much stronger mould there would have been less flex and it may not have helped as much, but it was a first couple of attempts and didnt want to make anything too strong in case I ended up entombing the wing forever if it didnt come out !

Posted: Sun Feb 14, 2016 4:39 pm
by Darkspeed
An extra thank you for the tip on using the brush to wick up excess resin - I had not considered that before, and it is very effective. Generally I weigh the glass and then make up 2.25 times for the resin weight (CSM). Using the brush wicking method after consolidating with a roller I managed to remove so much resin and as you say - far stronger and lighter. One of those tips I don't think you would ever find in a book.

I think one of the biggest mistakes that I made when starting out was not giving myself sufficient working time. I now take temperature readings of room and the piece and add the least amount of hardener I can to give me the longest working times - I am not in any hurry.

Weighing also made thing much easier for me as well as I knew that I would have the right amounts of everything. Tearing and making sure that the glass was cut to shape before laminating also helped greatly.

Like any process time spent on preparation makes the application far easier.

Posted: Sun Feb 14, 2016 6:34 pm
by gelmonkey
Darkspeed wrote:An extra thank you for the tip on using the brush to wick up excess resin - I had not considered that before, and it is very effective. Generally I weigh the glass and then make up 2.25 times for the resin weight (CSM). Using the brush wicking method after consolidating with a roller I managed to remove so much resin and as you say - far stronger and lighter. One of those tips I don't think you would ever find in a book.

I think one of the biggest mistakes that I made when starting out was not giving myself sufficient working time. I now take temperature readings of room and the piece and add the least amount of hardener I can to give me the longest working times - I am not in any hurry.

Weighing also made thing much easier for me as well as I knew that I would have the right amounts of everything. Tearing and making sure that the glass was cut to shape before laminating also helped greatly.

Like any process time spent on preparation makes the application far easier.
You have got it just about spot on with your methods and like you say the prep is everything .
As always the speed comes with expierience but also you must consider factors like how long is a corner area going to take and how log will it take to roller out what you have just wet out.
With regard to the catalyst be mindful that you can under catalise resin so that it only partially cures and heat wont do a whole lot of good.
If this does ever happen you can mix up a hotter mix of resin and paint that over the top which will do the job.
This is not ideal obviously and should only be done if the unit you are making is not particularly stressed or mega important ie the last layer on a mould or a closing laminate on glass that has already been applied and cured.

With regard to the wicking method it was something I started doing years ago and has always worked very well for me.
Some laminators I know say it is a pointless excersise but for me it looks a whole lot better its not so heavy and finally is so much more professional if making a mould for a customer .

Cheers
P

Posted: Sat Feb 20, 2016 9:37 am
by gelmonkey
Hi All
I have managed to get some time out in the garage this week and whilst progress has been made things did not work out quite as expected.
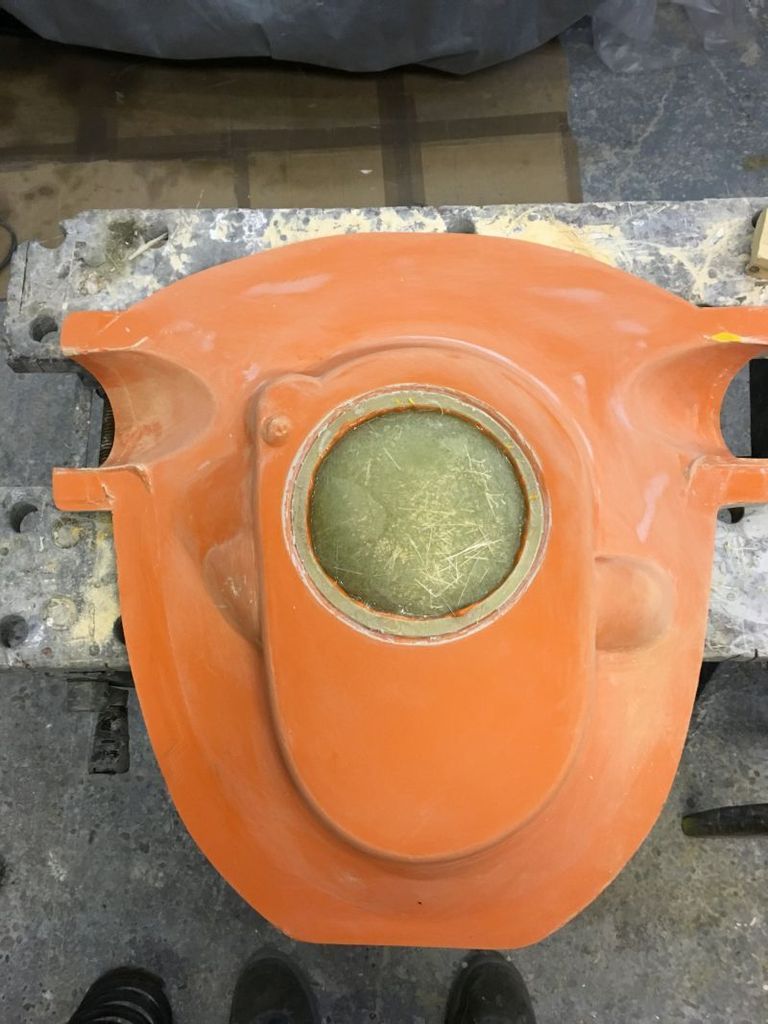
Having released the lower section and given that a sand down on 120 and then 400 grit paper it was obvious that I needed to do a few small repairs to make everything as it should be before final finishing on 1200.

Image

I turned my workshop and works van upside down looking for the orange pigment to the point that I thought I was losing the plot as I knew that I had some but could not find it anywhere.
So that part of the project had to go on hold so attention was turned to the upper main section.
Out with the stanley blade pin hammer and a load of spreaders I set to in releasing.

Image

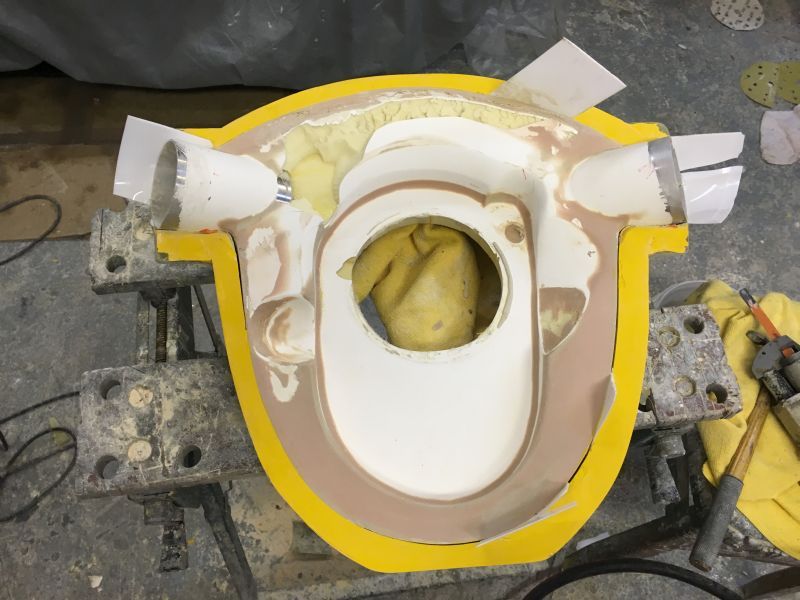
Initially things where going well as the plug could be heard as usual popping and cracking as it released but then it stopped moving up out of the mould which had me scratching my head for a moment as I could not work out what was stopping it.
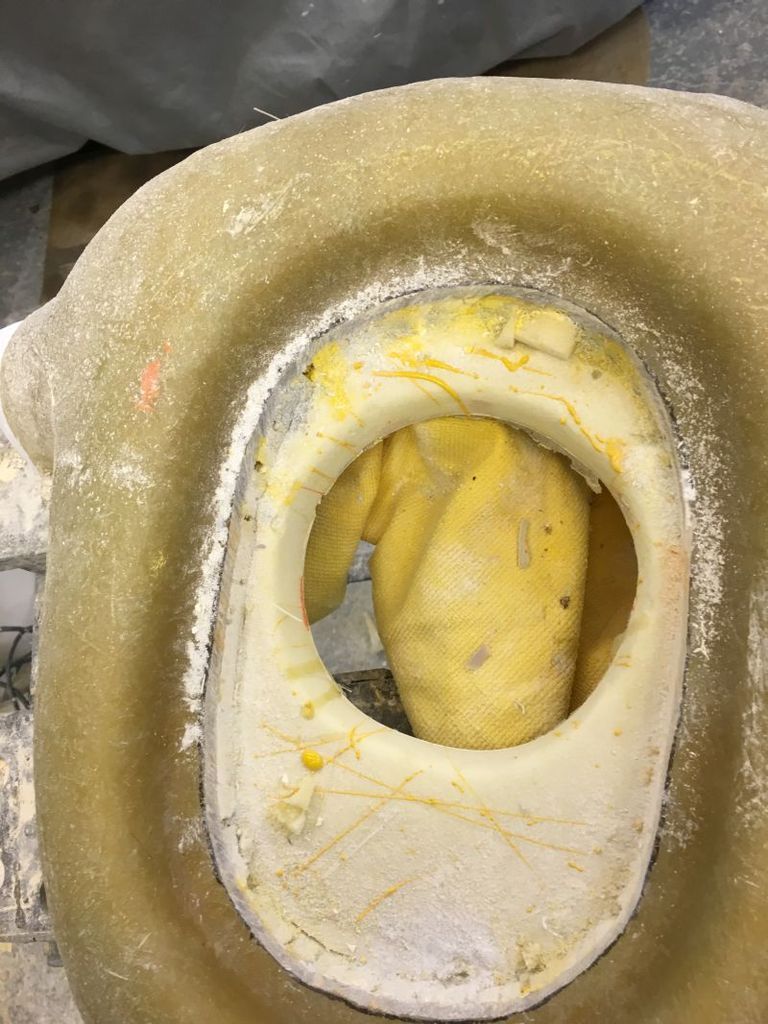
Ah ha cut out the glass from the top filter rebate you FOOL :lol:
Air hack saw in hand I soon made mincemeat of that little lot and this was what was left.
A point of note here it that this area of glass was always to be cut out as it does nothing for the mould at all.

Image


Image

Image

Then it was back to the spreaders and hammer plus a lot of patience as after all of the work that has gone into this i did not want to mess things up now.
Slowly and surely the plug came away from the mould but it was taking damage as it (the plug )was only made from foam some filler and a skim of gel so in real terms damage was inevitable.

The last bit of releasing was a bitch and in all honesty I was maybe a little too sure of how it was going to release once I got to this stage.
What I had missed when prepping the mould all those post ago was a very small lip right at the base of the top filter rebate and this was locking the thing in so tight it just did not want to move.
I only found this out after some severe carnage to the plug which I had hoped to show released and all but intact but the humble pie gods had other plans for me last night!

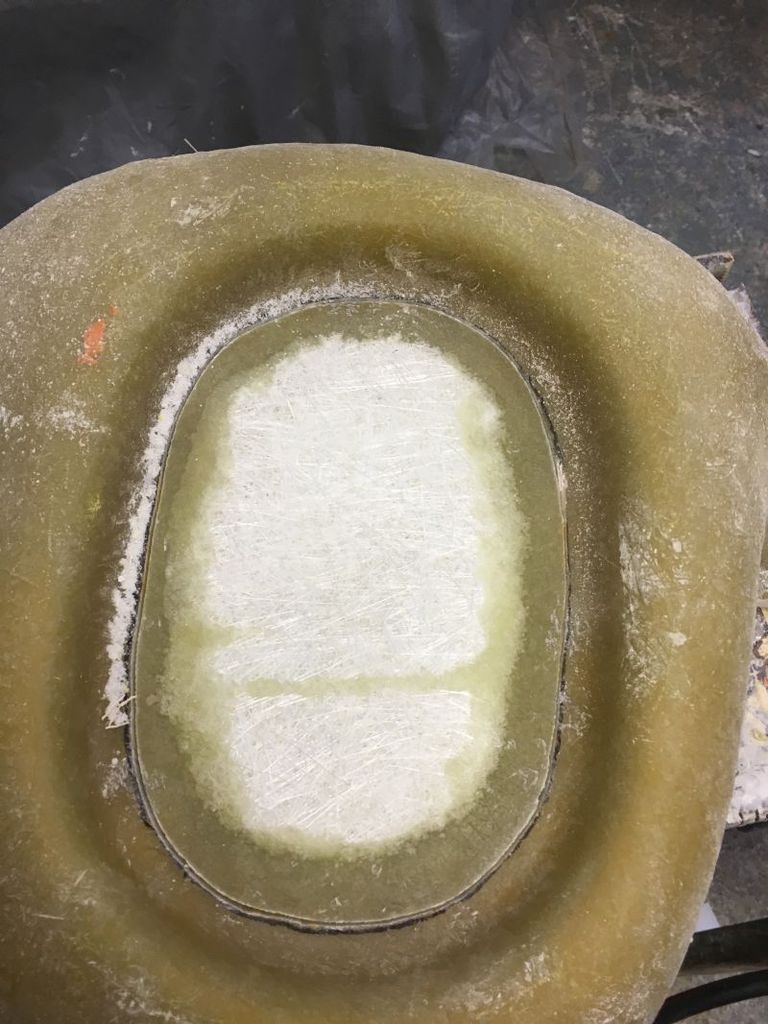
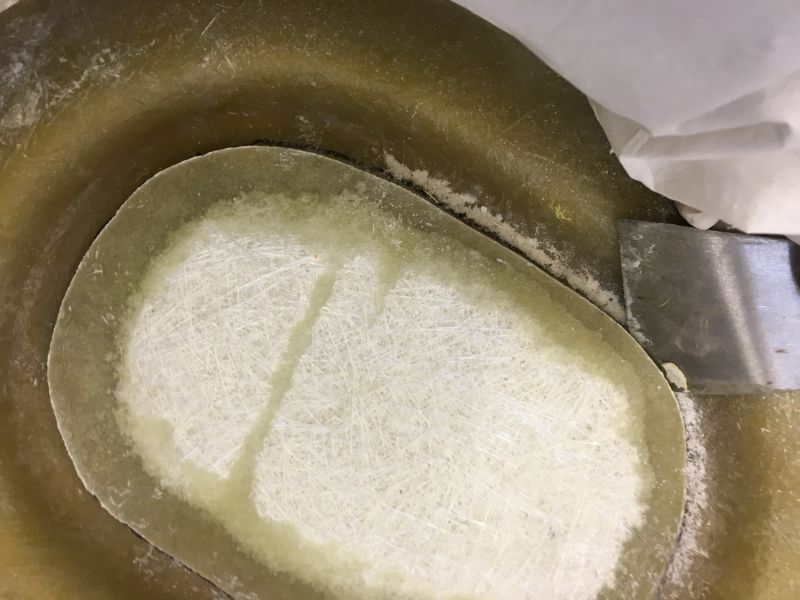
With everything finally released I could see immediately that there was a small amount of damage to the mould but this is very simple to repair and I will show how this is done maybe a little later on today.

Image

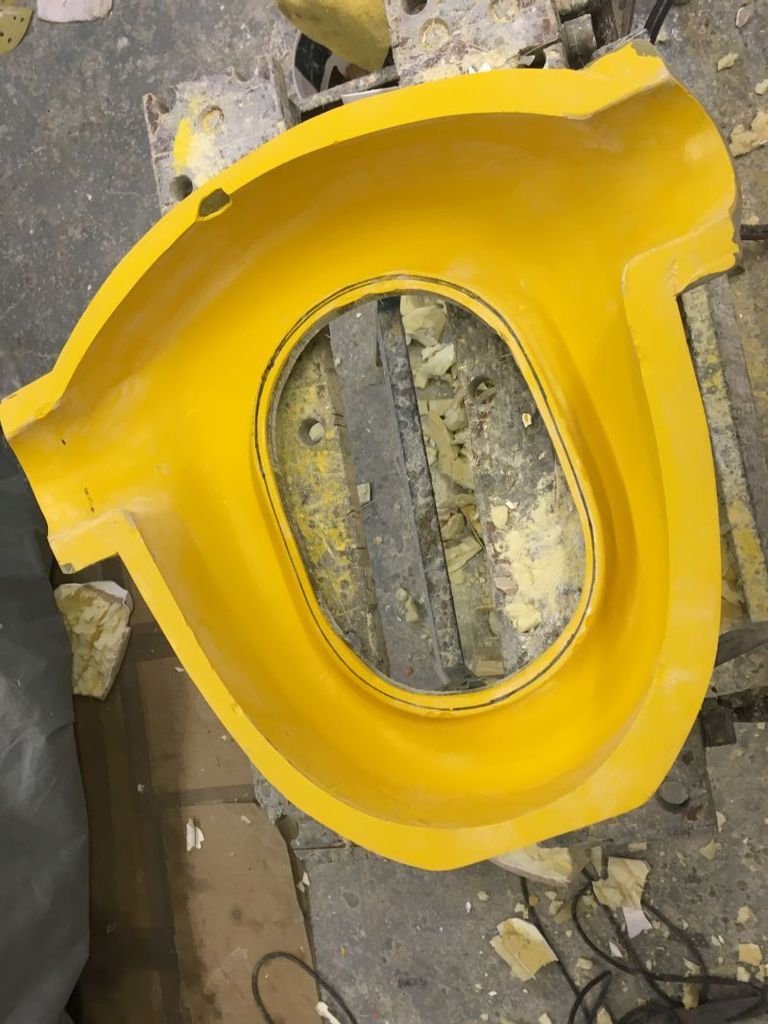
I also need to get rid of the little lip /defect at the bottom and then sand the whole lot down going through the grades and then a good polish up so I can make the real thing.
As the final unit will be just a shell releasing of the upper section will be much easier to do he said hopefully.

Image

Image


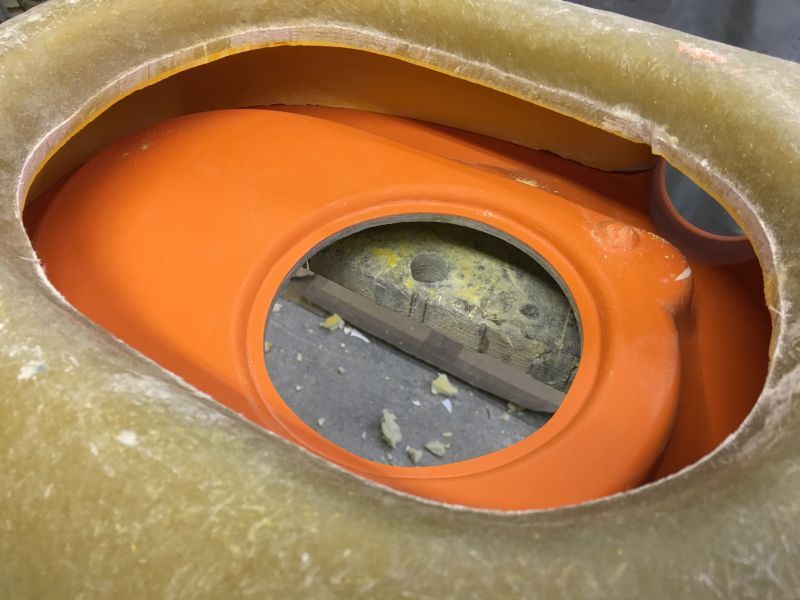
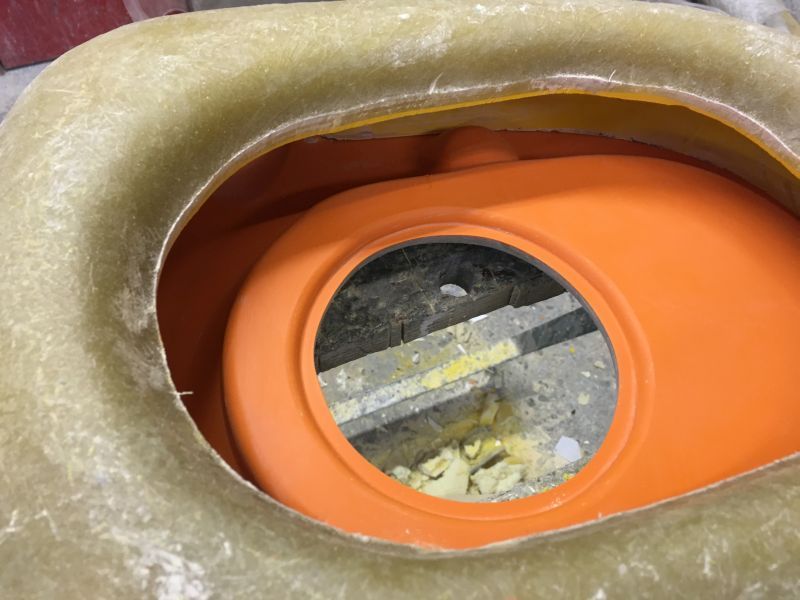
With the two sections together you can see that I will have a large internal area for the carb to draw from and with luck it will work out fine .

You can also see that I do need to do a little bit of final finishing around the filter rebate but this is just a few minutes work.

Oh and the orange gel pigment that I went mad looking for?
Yeah my son had it in his van but never told me he had took it from the garage.
What a bizzare way of handing your notice in........

Anon

Posted: Sat Feb 20, 2016 1:50 pm
by Darkspeed
Gelmonkey - Oh and the orange gel pigment that I went mad looking for?
Yeah my son had it in his van but never told me he had took it from the garage.
What a bizzare way of handing your notice in........
:lol: :lol: - Evil dad :evil:


I will hold back from doing my normal repair method - and see how the professional approaches it -

Image

Image

A bumper mould I made - I forgot to releive the gel around the edge of the part and a bigger chip than usual.

I have also been doing a few "splash" moulds to repairs to Ginetta G15's I have a front end to assist in repairing.

Image

Image

Image

I have also bought some 288g satin weave and some 225g glass to make a bumper part from - will see how it goes.

For a standard wing panel lay up I find that - gel/ tissue/300/450/450 makes a nice strong panel around 2.5mm thick the 300 wets out quickly and forms to any tight curves easily and then the 450's just work well taking the resin.

Using the Gelmonkey wicking up resin removal method I ended up with some of the nicest lay-ups I have ever done - I owe you a few beers for that.

Posted: Sat Feb 20, 2016 3:03 pm
by stevieturbo
the above is you making moulds from existing panels on the car ?

What did you do for borders/flanges...it almost looks like masking tape around the edges ?

Posted: Sat Feb 20, 2016 3:13 pm
by gelmonkey
Andrew
How many coats of gel are you applying in your moulding process please?
Please dont think I;m trying to teach you how to suck eggs as you clearly have an understanding of what is going on here but you could lose two of the laminates indicated with a greater gel thickness and a slightly thicker laminate and take a little more time on the corners.
Obviously your call on how you do your own stuff but why make more work than you need to?

Steve I will let Andrew answer your question.

cheers
P

Posted: Sat Feb 20, 2016 3:30 pm
by Darkspeed
Bit a thread hi jack - apologies Paul,

These moulds are not typical as they are not complete panels - although that is a bit difficult with a G15 as there are only 5 panels for the whole car. There are not any parting "shutters" on these where the moulds return back on themselves which would normally make the mould impossible to remove. On these area;s of the panels I only lay up tissue and 300 - this makes it flexible enough to remove but still provide a " lock in" for location.

First off I always use PVA - not great as it does not produce a perfect mould - you do need to work on the surface after - but if you plan to paint and not just leave in gel its not so important.

Three coats of wax over the PVA - I then mask out an area about 3" wider than the PVA and mask it - Gel / resin will not stick to masking tape the silicone release on the paper itself prevents this.

I had to extend the return on the wheel arches as these had been cut back on this car so I built them up with cardboard and masking tape to lay up against.

Image

Image

Image

Image


Image

Image

If needing to make up shutters for multi part moulds 3mm foam board is good stuff.

Hope this helps

Andrew

Posted: Sat Feb 20, 2016 3:49 pm
by gelmonkey
Andrew
Absolutley no need for apologies mate .

Again just an idea for you in future.
Instead of cardboard and then tape why just not PVA and then wax it?
I use mounting board from our local craft and hobby shop and have never had a problem in releasing
Also you will have no need to sand back any ripples or overlays from masking tape thus cutting down on working time.
If using the tape to hold the cardboard in place then why not use hot glue instead and then just soak it with acetone when ready to remove as this chemical makes the glue very brittle and it just falls off.

The other thing I noticed in your previous post was no cradle on the bumper mould unless it cannot be seen from the angle of the picture.
A small simple cradle would help stop the mould from moving around as you worked on it.
Again just a thought and PLEASE correct me if Im wrong

Posted: Sat Feb 20, 2016 3:50 pm
by Darkspeed
Hi Paul,

I am no more than an enthusiastic amateur and learning all the time - it always seems to be freezing cold when I do any of this and the gel coats when I done anything has been a single coat - which tends to end up about about 0.25mm thick at a guess.

I did note your 2-3 coats comment and thought of doing a couple on one the o/s pair of moulds but I only had a litre and it was going to be close getting all the moulds out of one tin.

I am all ears to how you do these things - With 6 glassfibre cars I am eager to learn. And please - I will not be offended if you put be straight on things I am doing wrong far from it.

Cheers

Andrew

ETA

- I would have used the hot glue gun but when I came to look for it - AWOL - just a bag of glue sticks.

The masking tape just give me a nice line to work to no real need for it on the body - With the arch it allowed me to produce / build up a working return angle .

Posted: Sat Feb 20, 2016 4:02 pm
by gelmonkey
Such a shame we live at other ends of the country as it would be great to hook up and have a good chat about glassing and of course the cars.
With regard to only having a liter of gel would it be worth considering buying a 5kg tin of clear gel and a pot of pigment as this would be more cost effective and you could easily do the extra couple of coats and have some left over.
I can always supply you at trade if you wanted

cheers
P

Posted: Sat Feb 20, 2016 4:05 pm
by stevieturbo
Interesting about the masking tape, I thought it would stick like crazy !

I bought that release tape Easy Composites sell. It aint overly cheap though, but it does work.

Posted: Sat Feb 20, 2016 4:06 pm
by Darkspeed
gelmonkey wrote:Such a shame we live at other ends of the country as it would be great to hook up and have a good chat about glassing and of course the cars.
With regard to only having a liter of gel would it be worth considering buying a 5kg tin of clear gel and a pot of pigment as this would be more cost effective and you could easily do the extra couple of coats and have some left over.
I can always supply you at trade if you wanted

cheers
P

Which is what I did the day after :lol: - Trade would be nice I am getting a fair amount of this stuff at the moment and a lot more to go! - It appears that as soon as folks find out you are making the odd part the phone starts ringing.